How to Scale Content Creation: A Guide for macOS Users
Scaling your content on a Mac isn't just about making more videos; it's about building a machine that produces high-quality, on-brand content efficiently. The secret sauce is doing the strategic work before you even think about hitting the record button. This upfront planning is the single biggest difference between sustainable growth and hitting a wall of creative burnout.
Build Your Scalable Content Foundation
Trying to scale content creation without a solid plan is a recipe for disaster. It's like trying to build a house without a blueprint—you might get a few walls up, but the whole thing is wobbly and will eventually come crashing down. Before you dive into workflows or hiring, you need to establish the "North Star" for all your content. This is your guiding set of principles that dictates what you create, why you create it, and who you're creating it for.
This foundational stage is where you move past vague ambitions like "get more views" and start connecting your content directly to real business objectives. It’s a crucial mental shift. We're seeing this play out on a massive scale, with large enterprises now driving the content creation market because they see it as essential for building brand reputation and keeping customers happy. You can find more on this strategic shift over at Future Market Insights.
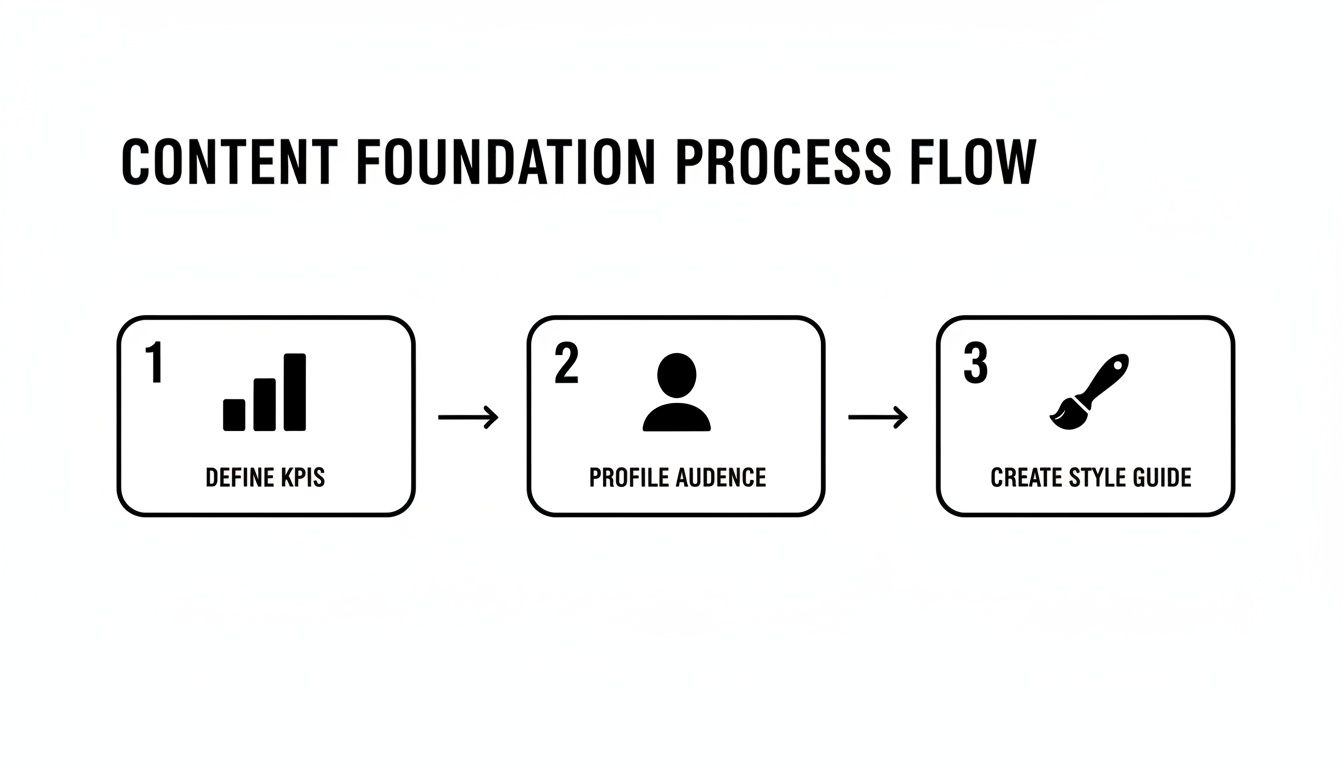
To get this foundation right, you need to lock in a few key pillars. This table breaks down what they are and why they matter.
Key Pillars of a Scalable Content Foundation
| Pillar | Purpose | Key Action Items |
|---|---|---|
| Goals & KPIs | To ensure every piece of content serves a specific business objective and its success can be measured. | - Define primary content goals (e.g., reduce support tickets, increase trial sign-ups). - Assign specific KPIs to each goal (e.g., watch time, conversion rate). |
| Content Pillars | To create a focused, consistent thematic structure for all content, making ideation easier and building topical authority. | - Identify 3-5 core themes your brand will "own" (e.g., Productivity Hacks for macOS, Software Demo Tips). - Brainstorm a list of sub-topics under each pillar. |
| Style Guide | To maintain brand consistency in look, feel, and tone, regardless of who is creating the content. | - Document on-screen branding (logos, colors, fonts). - Define video pacing, voiceover tone, and editing style. - Set guidelines for screen recording on macOS (e.g., clean desktop, cursor movement, specific resolution). |
Building this out properly is what allows you to hand off work to a team member or a freelancer and get back a video that looks and feels like you made it.
Define Your Goals and KPIs
Every single video you create has to have a job. Is it meant to reduce customer support tickets by showing users how to solve a common problem? Or is its job to get more people to sign up for a free trial? Each goal demands a different type of content and a completely different set of metrics to measure success.
Start by defining your big-picture objectives, then break them down into specific Key Performance Indicators (KPIs) you can actually track.
- Want to boost feature adoption? If you’re making a tutorial for a new macOS software feature, your main KPI might be the click-through rate on the in-app link you drop at the end of the video.
- Trying to build brand authority? To position yourself as an expert, you’d track metrics like watch time on your in-depth tutorials or how many shares your insightful demos get.
- Need to drive conversions? For marketing-focused videos, the number one KPI is almost always the conversion rate from your video's landing page to a trial signup or purchase.
When you tie your content directly to business goals, it stops being a "cost center" and becomes a value-driving engine. Every video has a purpose, and you can prove its worth with real numbers.
Develop Content Pillars and a Style Guide
Once you know why you're making content, you can define your content pillars. These are the core topics or themes your brand is going to own. For a macOS app developer, your pillars might be "Productivity Hacks for Mac," "macOS Software Demo Best Practices," and "Creating Engaging Tutorials on a Mac." Pillars make brainstorming a breeze and keep your content laser-focused on what your audience actually cares about.
Right alongside your pillars, a content style guide is completely non-negotiable if you want to scale. This is your playbook for consistency, no matter who's creating the video. It should spell out everything from on-screen branding and video pacing to the exact tone of voice for your narration. For a deeper dive into this, you can explore some content marketing best practices.
As you build this foundation, a solid content calendar template is your best friend. It helps you map everything out and acts as a pre-built roadmap for keeping your output consistent.
Design Your macOS Video Production Workflow
If you want to scale your content, you can't just work harder. You have to work smarter. The secret isn't more hours; it's a rock-solid system that turns chaotic, one-off video projects into a predictable, repeatable machine. For those of us creating on macOS, this means mapping out every single step of the journey, leveraging the unique strengths of the platform.
This blueprint covers everything from the spark of an idea to the final exported video, breaking it all down into simple, standardized tasks. When you do this, you kill the two biggest enemies of scale: guesswork and decision fatigue. No more reinventing the wheel every time. Instead, your team has a clear path to follow within your macOS ecosystem.
Before you even think about hitting record, you need to lay the groundwork. This is the strategic foundation that everything else is built on.
Get this right, and every piece of content you create will have a clear purpose and a consistent feel that builds your brand.
Standardize Your Pre-Production Assets
The biggest efficiency wins almost always come from standardization. Creating templates for your core assets is an absolute game-changer. Think of them less as documents and more as operational playbooks that guarantee consistency and quality, no matter who is working on the project.
Here are the must-have templates for any serious macOS video workflow:
- Script & Storyboard Templates: Build a standard document in Pages or a shared Google Doc with clear sections for the hook, key talking points, specific on-screen actions (like "cursor clicks on 'File > New'"), and a call to action. This forces clarity and ensures every script is built for impact from the ground up.
- Project File Templates: Set up a starter project file in your macOS video editor (like Final Cut Pro or ScreenFlow). This should already have your go-to folder structure (B-Roll, Audio, Graphics), your brand assets like logos and lower thirds pre-loaded, and your export settings dialed in. It’s a massive time-saver.
- Shot List Templates: Don't skip this, even for screen recordings. A simple shot list that outlines each scene, the action, and the matching voiceover line keeps recordings tight. You’ll be amazed at how much it cuts down on retakes.
By standardizing these assets, you create a plug-and-play system. A new team member or freelancer can jump into a project and immediately understand the structure, requirements, and desired outcome without extensive hand-holding.
Master Your macOS Recording Environment
For professional-looking content at scale, consistent recordings are non-negotiable. You need to optimize your Mac to eliminate variables so every recording session produces clean, ready-to-use footage. A little prep here saves hours in post-production.
Before you record, get your Mac ready for its close-up. Activate a Focus mode like "Do Not Disturb" from the Control Center so a random notification doesn't ruin the perfect take. Lock in your display resolution to something consistent, like 1920x1080, to avoid weirdly sized clips. I also highly recommend using a clean desktop or even a separate macOS User Account just for recording—it keeps personal files and clutter out of the shot.
This is where a purpose-built tool for macOS can make a huge difference. An application like Screen Charm is designed for exactly this, especially for software demos. Its auto-zoom feature is a lifesaver; it intelligently follows your cursor and highlights the action for you. That one feature can eliminate the tedious manual work of keyframing every zoom and pan. If you're looking for tools that fit this kind of efficient workflow, we've put together a guide on simple video editing software for Mac.
Structure Your Production and Post-Production Stages
With your templates and recording setup dialed in, the final piece of the puzzle is a clear, step-by-step process for the actual production and editing. This should be a linear flow with defined handoffs, so everyone knows who’s doing what and when.
A tried-and-true workflow often looks something like this:
- Recording: The designated "creator" or "performer" uses the script and shot list to capture all the screen and webcam footage on their Mac.
- Assembly & Rough Cut: An editor takes the raw footage, drops it into the project template, and assembles the main story. They'll cut out mistakes, sync up the audio, and get the basic narrative in place.
- Review & Feedback (Round 1): The rough cut is shared with key stakeholders for the first round of feedback.
- Refinement & Polish: The editor takes that feedback and starts adding the magic—motion graphics, color correction, and audio mastering.
- Final Review & Approval: The polished video gets one last look for any tiny tweaks before it's exported and ready to go live.
Assemble Your Content Creation Team
If you want to scale, you have to let go of doing everything yourself. It’s a tough pill to swallow, but trying to be the scriptwriter, presenter, editor, and marketer all at once is a surefire recipe for burnout.
To really grow your output without letting quality slide, you need a team. This is often the most intimidating step, but it’s absolutely essential. The goal is to build a well-oiled machine where specialists own their part of the process, freeing you up to focus on the big-picture strategy.

Defining Key Roles for Your macOS Video Workflow
Before you post a single job opening, you need to figure out who you’re actually looking for. What seats need to be filled? For a video workflow focused on macOS software demos and tutorials, the roles are pretty distinct. Just map out your entire production process, from the first spark of an idea to the final published video, and identify the core jobs.
Your team will likely need these specialists:
- Content Strategist/Scriptwriter: This is your pre-production lead. They’re the ones digging into topic research, outlining the video’s flow, and scripting the talking points to make sure every piece of content hits the mark.
- The "Performer" or Creator: This is your on-screen (or on-mic) talent. For macOS software tutorials, this person needs to be an expert who can navigate the app smoothly and explain things clearly, all while sticking to the script.
- Video Editor: Your post-production wizard. They’re the ones who take all the raw screen recordings and camera footage, chop out the mistakes, sprinkle in graphics and music, and polish it all into a final product that matches your brand’s style.
- Distributor/Marketer: This person makes sure people actually see the finished video. They handle the uploads, craft compelling descriptions and thumbnails, and push the content out across all your channels.
In the beginning, one person might wear a few of these hats. That's fine. But by defining the roles from the get-go, you can quickly spot your biggest bottleneck (hint: it's almost always video editing) and make your first hire to solve that specific problem.
In-House vs. Freelance Talent
Okay, you know who you need. Now, where do you find them? The big question is whether to hire full-time employees or bring on freelancers. There’s no single right answer here; it really comes down to your budget, how much content you’re producing, and how you prefer to manage people.
| Factor | In-House Team | Freelance Team |
|---|---|---|
| Cost | Higher upfront cost (salary, benefits). | Lower initial cost (pay per project/hour). |
| Integration | Deeply integrated into company culture. | More transactional, project-based relationship. |
| Availability | Dedicated and readily available. | Availability can vary based on their client load. |
| Scalability | Slower to scale up or down. | Highly flexible; easy to scale for specific projects. |
For a lot of creators who are just starting to scale, a hybrid model is the sweet spot. You might keep the Strategist and the "Performer" in-house to lock down your brand voice and core expertise, then outsource time-sucking technical tasks like video editing.
The decision to hire in-house or outsource isn't just about cost—it's about agility. Freelancers offer the ability to tap into specialized skills on demand, which is a powerful advantage when you're looking to scale quickly and test new content formats without long-term commitments.
This flexible approach is more important than ever. The global digital content creation market is projected to skyrocket to USD 137.59 billion by 2035, according to Precedence Research. That kind of growth signals that building a skilled, adaptable team is a non-negotiable for future success.
When you start your search, don't limit yourself geographically. There are amazing strategies for hiring remote content creators that can seriously expand your talent pool. Platforms like Upwork or specialized agencies can connect you with vetted professionals from all over the world. Just make sure you have crystal-clear Standard Operating Procedures (SOPs) in place to ensure smooth handoffs and consistent quality, no matter where your team is located.
Automate Your Content Pipeline on macOS
Once you’ve mapped out your workflow and got the right people in place, automation is the next big lever you can pull to truly scale. This is where you shift from trading time for content to building a system that churns out assets for you. Automation is all about offloading those repetitive, soul-crushing tasks so your team can focus on what actually matters: strategy and creative quality. If you're on a Mac, you're in luck—you've got a fantastic suite of built-in tools ready to go.
This isn't just a "nice to have" anymore. The demand for great digital content is exploding, with the market projected to hit nearly USD 70 billion by 2030. That's a massive wave of opportunity, and according to Grand View Research, it's only getting bigger. To keep up and stand out, smart automation is your best friend.

Start with Your Mac’s Built-In Automation Tools
Before you start spending money on third-party software, take a look at what’s already on your Mac. Apple's Automator and Shortcuts apps are seriously powerful and often overlooked. They're your secret weapons for building custom workflows to handle tedious jobs, and you don't need to know a single line of code.
Let’s say you just wrapped up recording five new software tutorials. Instead of manually resizing, compressing, and moving each video file to its correct project folder, you can build a simple automation to do it all for you.
Here's a quick and dirty example using Automator:
- Create a "Quick Action" that shows up in the Finder's contextual menu when you right-click a video file.
- Add an action that scales the video down to 1920x1080.
- Chain another action to compress the file with a specific preset to keep the size down.
- Finish with an action that moves the final, processed file right into your "Ready for Editing" folder on iCloud Drive or Dropbox.
What was once a multi-step, boring, and error-prone process is now a two-click task. If you want to go deeper, we've got a full guide on how to automate repetitive tasks that's packed with more ideas.
High-Impact Automation Opportunities for macOS Video Creators
For video creators on macOS, certain manual tasks are notorious time-sinks. Automating them doesn't just save a few minutes; it fundamentally changes your capacity. Here’s a look at where you can get the biggest wins.
| Manual Task | Automated Alternative | Primary Benefit |
|---|---|---|
| Resizing & Compressing Videos | Create a Quick Action in Automator or a Shortcut to apply presets. | Time Savings & Consistency: Ensures every video is perfectly optimized for editing or web upload with a single click. |
| Renaming Batches of Files | Use the batch rename function in Finder or an Automator workflow. | Organization & Clarity: Instantly apply consistent naming conventions (e.g., Project_Tutorial_01_Raw) to avoid confusion. |
| Creating Project Folders | Build a Shortcut that generates a complete folder structure (e.g., Raw, Edits, Audio, Exports) for new projects. | Error Reduction & Speed: Kicks off projects faster and ensures every asset has a designated home from the start. |
| Applying Watermarks | Use a tool like Permute or a custom FFmpeg script triggered by a Shortcut. | Brand Consistency: Automatically adds your logo or branding to all final exports without opening an editor. |
By targeting these specific bottlenecks, you free up significant mental bandwidth and production time. It's about building a machine that handles the grunt work so you can focus on the creative.
Adopt a “Create Once, Publish Everywhere” Mentality
Real scale isn't just about making new videos faster; it's about wringing every last drop of value out of the content you already have. This is the art of repurposing—it’s the ultimate growth hack for any Mac-based creator. A single long-form tutorial isn't just one piece of content; it's the raw material for a dozen smaller assets.
Your goal is to atomize your pillar content. Think of that 10-minute software demo as a block of marble. Your job is to chip away at it to create multiple smaller sculptures, each perfect for a different gallery (or platform). This multiplies your output without you ever having to hit "record" again.
This strategy is incredibly powerful. That one video can easily become:
- 5-7 short highlight clips: Perfect for social media, each one showcasing a single killer feature or a quick tip.
- A detailed blog post: Grab screenshots from the video, write up the steps, and embed the full tutorial for those who want to go deeper.
- A bunch of high-quality GIFs: Drop these into your documentation, knowledge base, or support chats to answer common questions visually.
- An audio track: Strip the audio, clean it up, and you’ve got a podcast episode discussing the tutorial's core concepts.
Build Your Repurposing Toolkit on Your Mac
To make this repurposing workflow fly on macOS, you need the right tools in your corner. The trick is to find apps that are fast, reliable, and play nicely together. A killer combo for video creators usually includes a great screen recorder, a solid GIF maker, and a social media scheduler.
For instance, after recording your main tutorial with a tool like Screen Charm, you could use an app like Gifox to quickly grab segments and turn them into crisp, high-quality GIFs. From there, fire up Buffer or Later to schedule out your short video clips and GIFs across all your social channels for the next couple of weeks.
By pairing native macOS automation with a smart repurposing strategy, you’re not just making content anymore. You're building an asset-generating engine that keeps working for you long after you’ve published.
Measure and Refine Your Content Performance
Hitting "publish" on more videos is a great feeling, but it's only half the equation. If you're churning out content without a system to measure its impact and maintain quality, you're just scaling up noise. The real magic happens when you build a feedback loop—a way to ensure every video isn't just done, but done well and actually moving the needle.
Think of this stage as the final checkpoint on your production line. It's where you catch those tiny-but-embarrassing typos before the world sees them. More importantly, it’s where you collect the hard data you need to make your next batch of videos even sharper. Without this, you're flying blind.
Create a No-Nonsense Quality Control Checklist
Before any video sees the light of day, it needs to pass a standardized quality control (QC) check. This isn't about being a perfectionist; it's about protecting your brand and delivering a professional experience to your audience.
The key is to create a simple, repeatable checklist that anyone on your team can use, whether it’s a freelance editor or your head of marketing. This takes the guesswork out of the process and establishes a clear baseline for quality—a non-negotiable step if you’re serious about scaling.
Your pre-publish QC list should cover the basics, like:
- Technical Specs: Is the export in the right format and resolution (e.g., 1080p H.264)? Are the audio levels consistent, without any weird background hum? Is all the on-screen text typo-free?
- Brand Consistency: Does the video use our official colors, fonts, and logos from the style guide? Does the tone of voice match our brand personality?
- Content Accuracy: Are the steps in the macOS software demo actually correct? Is the data we're citing up-to-date? Does the call-to-action button actually go to the right landing page?
Track the KPIs That Actually Mean Something
Once your video is live, its work is just getting started. Now it's time to see how it performs against the goals you set way back in the planning stage. It's easy to get distracted by vanity metrics like total views, but those numbers rarely tell the full story.
To get a real sense of your video’s impact, you have to focus on the Key Performance Indicators (KPIs) that connect directly to its purpose.
The right metrics always depend on the job the video was hired to do.
- For macOS Software Tutorials: Your north star is probably average watch time. If people are sticking around, it means they're finding the tutorial genuinely useful. This often translates directly into better product adoption and fewer customer support tickets.
- For Marketing Videos: Here, it’s all about the business impact. Look at the conversion rate. How many people who watched the video clicked the link to sign up for a trial or book a demo? That’s the number that matters.
- For Brand-Building Content: If you're trying to build authority, focus on engagement signals like shares and comments. These actions show that your content is striking a chord and sparking conversations.
Tracking the right KPIs turns your content from a line item on a budget into a measurable asset. It's the difference between saying, "Our videos got 10,000 views," and saying, "This tutorial series cut our support ticket volume by 15%."
This data-driven approach is what fuels continuous improvement. When you see which videos have the highest watch times or the best conversion rates, your audience is literally telling you what they want more of. Use those insights to inform your next content sprint, and you'll create a powerful cycle: you measure, you learn, and you get better. Your scaled-up content machine doesn't just get bigger; it gets smarter.
Frequently Asked Questions
Scaling up your content production is a huge step, and it's natural to hit a few snags along the way. I've seen creators run into the same challenges time and again, so let's break down some of the most common questions with advice that actually works, especially if you're building your system on a Mac.
How Do I Keep Our Brand Consistent with Multiple People Creating Content?
This is a huge one. When you scale, brand consistency can easily fall apart. The absolute best tool for this is a detailed Brand and Content Style Guide. Think of it as the single source of truth for your brand’s personality—its voice, tone, and visual signature.
For video creators on macOS, this guide has to be ruthlessly specific. It should include things like:
- Downloadable intro and outro templates for your video editor (e.g., Final Cut Pro project files).
- The exact preset backgrounds and clean desktop images to use for screen recordings.
- The specific HEX codes for any on-screen text or graphics.
- Even guidelines on the pacing for tutorials to ensure every video feels familiar to your audience.
A great style guide isn't just a document—it's an operational playbook. Pair it with a shared cloud library for assets (like iCloud Drive or Dropbox) and standardized project templates, and you’ll empower any creator, whether they're in-house or a freelancer, to produce content that is unmistakably yours.
What's the Single Biggest Bottleneck in the Content Creation Process?
I see it time and time again: the review and approval process. A video can be 95% finished and then just sit there for days, or even weeks, waiting for someone to give it the green light. When you're trying to scale, that kind of delay is a killer.
The fix is to build a rock-solid review workflow with clear stages and hard deadlines. Assign specific people to review specific things (like the script, the rough cut, and the final polish) and cap the feedback to a maximum of two rounds. Ditch the endless email chains and use tools that let reviewers leave time-stamped comments directly on the video. The feedback becomes precise, actionable, and so much faster to implement.
Should We Focus on Making New Content or Repurposing What We Already Have?
For any team serious about scaling, the answer is a strategic mix, but you should lean heavily on repurposing existing content. Sure, creating brand-new "pillar" content is essential for staying fresh, but repurposing is where you get true leverage. It's the fastest way to multiply your output without multiplying your effort.
That one 10-minute software tutorial you filmed on your Mac? It's a goldmine. You can splinter it into dozens of other assets:
- Social Media Clips: Pull out 5-7 short, punchy videos that highlight a key feature or a quick tip.
- A Step-by-Step Blog Post: Grab screenshots from the recording (using
Cmd+Shift+4), write a detailed guide, and then embed the full video at the top. - High-Quality GIFs: Turn a key workflow into a silent, looping GIF to use in your knowledge base or in customer support chats.
This "create once, publish everywhere" mindset is how you maximize the ROI on every single minute you spend recording.
What Are the First Hires to Make for a Growing Video Team?
When you’re finally ready to stop doing everything yourself, your first hire should solve your biggest problem or fill your biggest skill gap. For most macOS-based video creators, that person is almost always the Video Editor.
Editing is a specialized skill, and it's incredibly time-consuming. By handing off the editing to a freelance or part-time pro, the main creator can get back to what they do best: planning, scripting, and recording top-notch content. This one move alone can often double your production capacity overnight.
After an editor, the next role is usually a Scriptwriter or Content Strategist. This person takes on the research and writing, making sure every video is well-structured and genuinely valuable. This simple division of labor is the first real step in turning a solo act into a true content machine.
Ready to create polished, professional-looking product demos and tutorials on your Mac, but without the headache of a steep learning curve? Screen Charm packs powerful features like auto-zoom and a simple built-in editor to make your video creation process faster and more impressive. Discover how Screen Charm can elevate your content.