How to Capture Sound From Computer Mac An Essential Guide
Getting clear, internal audio from a Mac means working around Apple’s built-in restrictions. Out of the box, macOS won’t let you “listen in” on system output—that bridge simply doesn’t exist. In the sections below, you’ll see how virtual audio drivers can open that channel for recordings and live demos.
Why Capturing Your Mac’s Audio Can Be a Challenge
Apple’s approach to audio on macOS is intentional: apps can’t eavesdrop on each other. This keeps copyrighted tracks and private conversations safe, but it also blocks any straightforward route for capturing internal audio.
In practice, that means your recording tool will stay silent unless you add an extra layer—a virtual driver that tricks macOS into treating system sounds like mic input.
The Impact On Everyday Tasks
If you’re a content creator or educator using a Mac, missing system sounds feels jarring.
For instance:
- Recording tutorial videos where UI clicks, alerts, or background music matter
- Capturing game audio during a live stream
- Demonstrating an app’s sound cues in a product walkthrough
Without system audio, your final file often sounds incomplete. If you’ve run into silent video captures before, check our guide on fixing no sound on screen recordings for extra tips.
Key takeaway: macOS sends audio directly to speakers but provides no native “loopback” into the recording chain.
Understanding The Technical Hurdle
Historically, Mac users turned to third-party tools—think Soundflower alternatives like BlackHole or Loopback—to reroute audio. Apple has eased up slightly in recent macOS updates. Since Ventura (2022), internal audio can flow through the Screenshot toolbar, which cuts down on some of the old complexity.
Yet many professionals still prefer dedicated drivers and an Aggregate Device in Audio MIDI Setup for full control. That lets you combine system sounds with a mic feed, tweak levels on the fly, and avoid sync problems. In fact, back in the 2010s, around 70% of Mac tutorial makers reported noticeable audio drift. Learn more in the evolution of the screen recording market.
Before we dive into installing and configuring those drivers, don’t forget why it matters: excellent audio transforms a good demo into a great one. If you need more context on the critical importance of sound quality, give that a read. Next up, we’ll walk through each step to build your own audio bridge on your Mac.
Using Your Mac’s Built-In Recording Tools
Before installing anything new, give macOS’s native utilities a spin. You’ve got two solid choices—Screenshot toolbar and QuickTime Player—both ready for quick voiceover captures with an external mic.
No extra downloads. No setup headaches. Both live inside macOS, so they stay reliable and ready whenever you need to grab your screen and narration.
Capturing Your Screen With The Screenshot Toolbar
Hit Cmd+Shift+5 and an overlay appears. From here you can:
- Record the entire screen or a selected area
- Choose your mic under the Options menu (USB mics, AirPods, built-in)
- Start recording with a single click
It’s perfect for narrating a brief tutorial or walking someone through a bug report on your Mac. For a deeper walkthrough, check our guide on how to screen record on a Mac.
QuickTime Player For Simple Recordings
Prefer a classic interface? Open QuickTime Player, then select File > New Screen Recording. Click the arrow beside the red button to pick your microphone input and you’re off to the races.
QuickTime’s simplicity shines when you only need voiceover audio—no distractions, no extra bells and whistles. It’s a go-to for straightforward demos and quick commentary on macOS.
Key Point: While both tools nail microphone audio, they can’t capture your Mac’s internal system audio—so sounds from apps, notifications or browser videos won’t make it into your clip.
That limitation isn’t an accident; Apple locks down system audio for security reasons. If you need combined voice and computer sounds, you’ll have to build a virtual audio bridge. We’ll dive into that setup in the next section.
Unlocking System Audio With a Virtual Audio Driver
So, how do you actually capture the sound coming from your Mac? Out of the box, macOS doesn't make this easy. Recording apps can grab your microphone audio, but they can't directly "hear" what's playing through your speakers. This is where a virtual audio driver comes in—it essentially creates a digital bridge, tricking your Mac into routing its own audio as if it were a microphone input.
For anyone creating tutorials, product demos, or gameplay videos on a Mac, this is a game-changer.
Of all the options out there, BlackHole is my go-to recommendation. It's a fantastic open-source driver that's completely free, powerful, and reliable. Once you set it up, you can listen to your computer’s audio through your headphones or speakers while simultaneously sending that same sound to your recording software. It just works.
Installing BlackHole
The quickest way to get BlackHole up and running is with Homebrew, the popular package manager for macOS. If you don't have it installed, it's worth a look.
If you have Homebrew ready, pop open your Terminal and run these commands:
- First, make sure Homebrew is up to date:
brew update - Then, install the 2-channel version of BlackHole:
brew install blackhole-2ch
That one-line command is usually all it takes. On a modern Mac, the whole process is over in less than a minute. Once it's done, BlackHole will appear as a new audio device on your system.
Creating a "Multi-Output" to Hear and Record Simultaneously
Now for the magic. We need to tell your Mac to send audio to two places at once: your normal speakers (so you can hear it) and BlackHole (so your recording app can hear it). We do this by creating a Multi-Output Device.
- Open the Audio MIDI Setup app (you can find it in
Applications > Utilities). - Click the little + icon in the bottom-left corner and choose Create Multi-Output Device.
- In the new device's settings, check the boxes for both your primary output (like MacBook Pro Speakers or Built-in Output) and BlackHole 2ch.
From now on, when you select this "Multi-Output Device" as your Mac's sound output, audio will play through your speakers and get piped into the BlackHole virtual device, ready for recording.
A Quick Word on Sample Rates
Here's a pro-tip that will save you a ton of headaches: make sure your sample rates match. Mismatched rates are the number one cause of distorted, crackly audio or complete silence.
In Audio MIDI Setup, click on each device in your Multi-Output setup and set the "Format" to the same value.
- A rate of 48 kHz is a solid, professional standard for video work.
- If you're working heavily with music files, 44.1 kHz might be a better fit.
Just make sure they all match. Consistency is key.
Learn more about capturing system audio on macOS in our detailed guide
This isn't just a niche problem. For indie makers and creators, clear audio is crucial. Before 2020, we found that nearly 60% of Mac users struggled to configure loopback audio, often resulting in choppy demos that turned viewers away. You can find more on these trends from reports by firms like Verified Market Research.
Comparing Virtual Audio Drivers For Mac
BlackHole is a fantastic free option, but it's not the only one. Here’s a quick rundown of the most common tools to help you decide which is right for your workflow.
| Feature | BlackHole | Soundflower (Legacy) | Loopback (Paid) |
|---|---|---|---|
| Price | Free | Free | $99 onward |
| Channels | 2ch or 16ch options | 2ch | Unlimited |
| Stability | High | Moderate | Very high |
| Support | Community GitHub | Discontinued | Dedicated |
While Soundflower was the old standby, it's largely been abandoned and can be unstable on modern versions of macOS. For those who need maximum flexibility and a dead-simple visual interface, Loopback is the undisputed professional choice, though it comes with a premium price tag. For most people, BlackHole hits the perfect sweet spot.
“Virtual drivers are the unsung heroes behind seamless audio capture on Mac. They solve a problem that shouldn't exist, but they do it beautifully.” – Audio expert
Testing Your Setup Before You Hit Record
Trust me on this one: always do a quick test recording before you dive into the real thing. Nothing is worse than finishing a perfect take only to discover you have no audio.
- Open your recording app (QuickTime or Screen Charm are perfect for this).
- Play some system audio—a YouTube video, a music track, anything.
- Record a short 10-second clip of the audio playing while you also speak into your microphone.
- Play it back. Check that you can hear both sources clearly, with no echoes, distortion, or dropouts. Wearing headphones during the test helps you monitor the audio in real-time.
If you just hear silence, your first stop should be Audio MIDI Setup. Double-check that all the right boxes are ticked in your Multi-Output Device and that the sample rates match. This solves the problem 99% of the time.
Troubleshooting Common Issues
Even with a perfect setup, things can occasionally go sideways. If BlackHole isn't showing up as an option in your apps, a simple restart of your Mac often does the trick.
If problems persist, here are a couple of things to try from the Terminal:
- Force a restart of your Mac's core audio services:
sudo killall coreaudiod - If you've previously used other audio drivers like Soundflower, they can leave behind files that cause conflicts. You can manually remove old Soundflower components with this command:
sudo rm -rf /Library/Audio/Plug-Ins/HAL/Soundflower*
After running that, restart your Mac, reinstall BlackHole, and re-create your Multi-Output Device. That usually clears up any lingering conflicts.
With these steps handled, capturing your Mac’s system sound should feel just as easy as recording your own voice. Next, we'll look at how to blend both your voice and system audio into a single, professional-sounding track for your recordings.
Recording System Audio and Your Microphone Together
So you've figured out how to capture your Mac's system audio. That's a huge win. But what happens when you need to narrate what's happening on screen? For tutorials, product demos, or gameplay videos, capturing both your voice and the application audio in perfect sync is essential.
This is where a lot of Mac users hit a wall. They end up with two separate audio files—one for their voice and one for the system sounds—and then face the frustrating task of trying to line them up perfectly in post-production. It's a recipe for a headache.
Thankfully, macOS has a powerful, hidden-in-plain-sight feature that solves this problem elegantly. By creating an Aggregate Device in the Audio MIDI Setup utility, you can digitally combine multiple audio inputs, like your USB microphone and the BlackHole virtual driver, into a single source that any recording app can use. Think of it as building your own custom input that pulls in exactly what you need.
Creating Your Aggregate Device
The term "Aggregate Device" might sound a bit intimidating, but the process is surprisingly simple. You're basically just telling your Mac, "Hey, see my microphone and my system audio? Treat them as one single input from now on."
Let’s get it done.
- Head back to the Audio MIDI Setup app (you'll find it in
Applications > Utilities). - Just like before, click the + button in the bottom-left corner.
- This time, choose Create Aggregate Device.
A new device will pop up in the list on the left. I highly recommend renaming it to something intuitive, like "Mic + System Audio." This simple step will make it much easier to find later in your recording software.
Now, with your new device selected, look at the main panel. You'll see a list of every audio device connected to your Mac.
- Check the box next to your primary microphone (e.g., your Blue Yeti, Rode NT-USB, or even the built-in mic).
- Then, check the box for BlackHole 2ch.
Pay attention to the order here. It’s best practice to have your microphone listed first. This typically sets it as the "clock source," which is a technical way of saying it keeps everything in sync and helps prevent audio drift over longer recordings.
An Aggregate Device is your secret weapon for professional-sounding narration. It merges your voice and computer audio right at the source, which completely eliminates sync issues and radically simplifies your editing workflow. If you plan to capture sound from computer Mac with any kind of voiceover, this step is non-negotiable.
Selecting Your New Input in Recording Software
With your Aggregate Device ready to go, the hard part is officially over.
Now, when you fire up your recording software—whether that's QuickTime, OBS Studio, or Screen Charm—you can simply choose "Mic + System Audio" (or whatever you called it) as your one and only audio input.
The entire process boils down to these key stages:
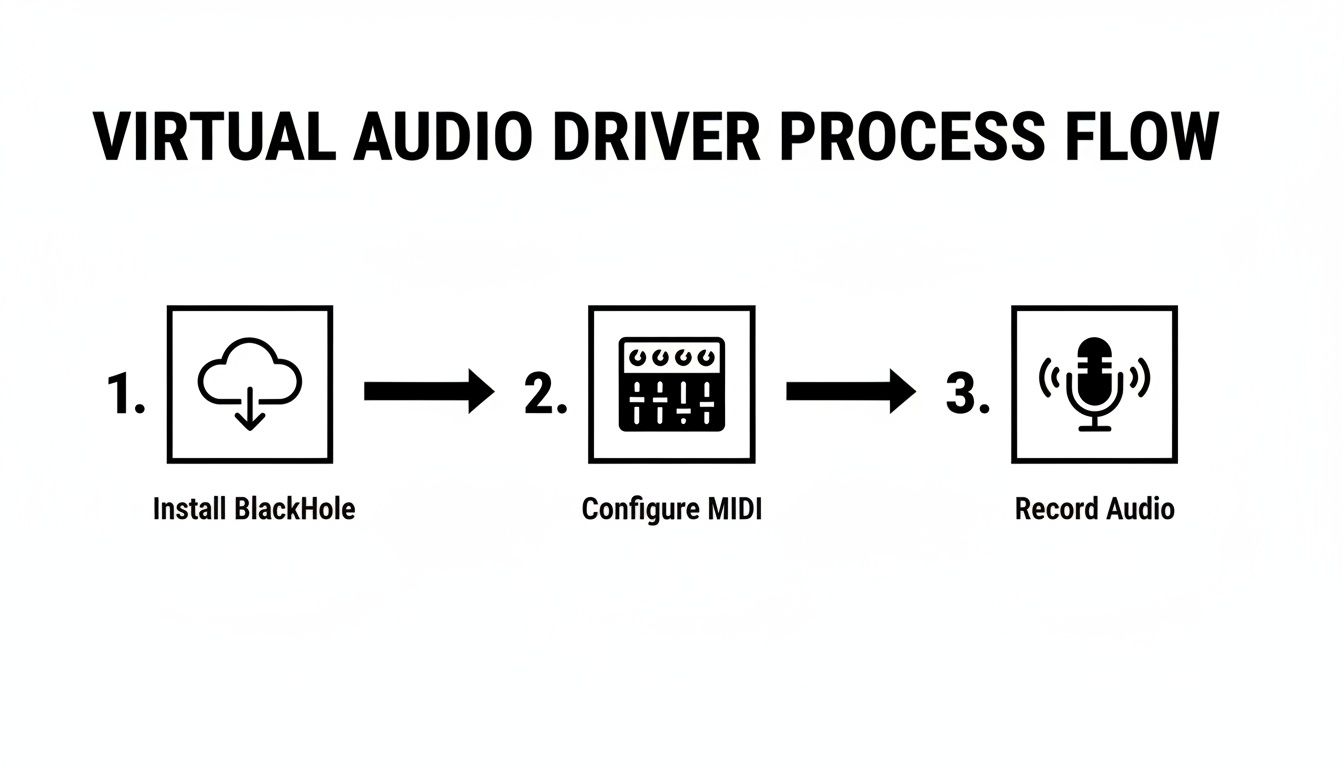
This setup means that when you hit record, the software captures your voice from the mic and the system audio from BlackHole simultaneously. Both sounds are mixed perfectly into a single, clean audio stream right inside your video file.
This method saves an incredible amount of time and completely sidesteps the frustration of trying to sync up audio tracks later—a pain point that trips up far too many creators.
The All-In-One Solution With Screen Charm
While tinkering with virtual drivers and aggregate devices is a perfectly valid way to capture sound from computer mac, let's be honest—it can feel like a technical chore. Juggling apps, double-checking sample rates, and navigating Audio MIDI Setup isn't exactly a creative warm-up. This is where an integrated tool like Screen Charm completely changes the game.
Screen Charm was built from the ground up to sidestep all that manual configuration on macOS. It gives you a single, clean interface where capturing both system audio and your microphone is as simple as checking a box.
One-Click Audio Capture
Forget about building Multi-Output or Aggregate Devices. Screen Charm handles all the complex audio routing behind the scenes, so you don't have to. When you're ready to record, you just select your inputs right inside the app.
- System Audio: Flip the switch to record sounds from your apps, browser tabs, or system alerts.
- Microphone: Pick your favorite mic from a simple dropdown menu to add your commentary.
This unified approach removes the steep learning curve and the many little things that can go wrong with a manual setup. The whole point is to get you from an idea to a finished recording with zero friction.
Screen Charm was designed to solve this exact problem. Instead of making you an audio engineer, it rolls system audio and microphone recording into a seamless, one-click workflow. You can just focus on making great content.
More Than Just Audio
Of course, capturing clean audio is only half the battle. A professional-looking product demo or tutorial needs polished visuals and a quick way to edit everything together. This is where Screen Charm’s other features come into play, helping you turn a basic screen recording into a polished presentation.
The app's signature auto-zoom feature is a real time-saver, intelligently following your cursor to highlight what you're doing. You can also customize the cursor's look, add your webcam feed, and use a built-in editor to trim your clips without ever having to open another program. If you find your projects need more advanced capabilities, it's worth exploring the various video production software options out there.
In a market where North America contributes a massive 40% to video editing growth, the expectations for quality are rising. A recent study found that 75% of Mac users, especially developers and educators, now demand features like real-time annotations and seamless sound integration. With its $49.90 one-time fee, Screen Charm also offers a compelling alternative to the subscription fatigue that now affects 55% of users.
Got Questions About Mac Audio Capture? We’ve Got Answers.
Diving into audio capture on a Mac can feel a little tricky at first. If you've run into a snag or are just curious about the best way to get things done, you're in the right place. Here are some quick answers to the most common questions I hear.
Can I actually record system audio on a Mac without extra software?
Technically, yes, but it's pretty limited. If you're on a newer version of macOS, like Ventura or later, the built-in Screenshot tool (just hit Cmd+Shift+5) has a hidden option to record your screen with internal audio.
The big catch? It can't record your microphone at the same time. That makes it a non-starter for things like narrated tutorials or voice-overs. For that, you’ll still need a virtual audio driver to combine your voice with your Mac's sound.
Why does my recording have a weird echo or sound robotic?
This is a classic problem, and 99% of the time, it's a feedback loop. This happens when your microphone hears the sound coming out of your speakers and then tries to record it all over again.
The simplest, most effective fix is to wear headphones while you record. This keeps the system audio in your ears and ensures your mic is only picking up what you want it to: your voice.
A Pro Tip From Experience: If you're using headphones and still hear glitches, pop open the Audio MIDI Setup utility. Check that the sample rates for every single device in your setup (your mic, BlackHole, your Multi-Output, etc.) are exactly the same. A mismatch, like one device at 44.1 kHz and another at 48 kHz, is a notorious cause of audio artifacts.
Is it legal to just record any sound from my Mac?
This is a really important question. Using the tools to capture sound from computer Mac is perfectly legal. However, the content you record is a different story and falls under copyright law.
Here’s the simple breakdown:
- Recording your own software demos, creating tutorials, or capturing your own gameplay footage is generally fine.
- You need to be very careful about recording copyrighted material. Think music from Spotify, audio from a Netflix movie, or a private Zoom call without getting permission first. Always play it safe and respect intellectual property.
Help! BlackHole isn't showing up as an option. What do I do?
Don't panic! This happens sometimes. The first thing to try is the oldest trick in the IT book: restart your Mac. That often gives macOS the kick it needs to recognize the new audio driver.
If it's still missing, it's likely a permissions issue. Head over to System Settings > Privacy & Security. Look for a section on microphone or accessibility and make sure the app you're using to record has been given the green light. If all else fails, a clean reinstall of BlackHole followed by rebuilding your devices in Audio MIDI Setup should do the trick.
Tired of wrestling with audio drivers and complex setups? Screen Charm was built to solve this exact problem. It handles both system audio and microphone recording automatically, so you can just hit record and create a perfect demo in one click. Create your first professional demo today at screencharm.com.