Mastering Screen Capture on Mac for Demos and Tutorials
Grabbing a quick screenshot on a Mac is one of those things that feels like second nature once you know the shortcuts. If you need a picture of your entire screen, just hit Shift + Command + 3. To capture just a specific part, use Shift + Command + 4. Honestly, for most day-to-day needs on macOS, these two commands are all you'll ever need—no extra software required.
Your Guide to Native Mac Screen Capture Tools
Before you go hunting for a third-party app, it’s worth getting to know the fantastic screen capture tools already built right into macOS. They're quick, reliable, and more than capable of handling everything from documenting a weird software bug for IT to snagging a chart for your next presentation. Mastering these built-in options is the key to a smoother, faster workflow.
The real power of Mac's screenshot tools lies in a few simple keyboard shortcuts. Each one is designed for a specific job, giving you pinpoint control over what you capture.
- Entire Screen: This is your go-to when you need to show everything—the full desktop, menu bar, Dock, and all. It’s all about context.
- Selected Area: Perfect for when you just want to isolate a single paragraph, a specific image, or a small section of a webpage. It keeps the focus tight and eliminates clutter.
- Specific Window: This one is brilliant for capturing a single application window. It even adds a clean, professional-looking drop shadow around the edges automatically.
Choosing the Right Capture Method
Knowing which macOS shortcut to use is half the battle. This simple decision guide can help you figure out the best tool for the job in just a few seconds.
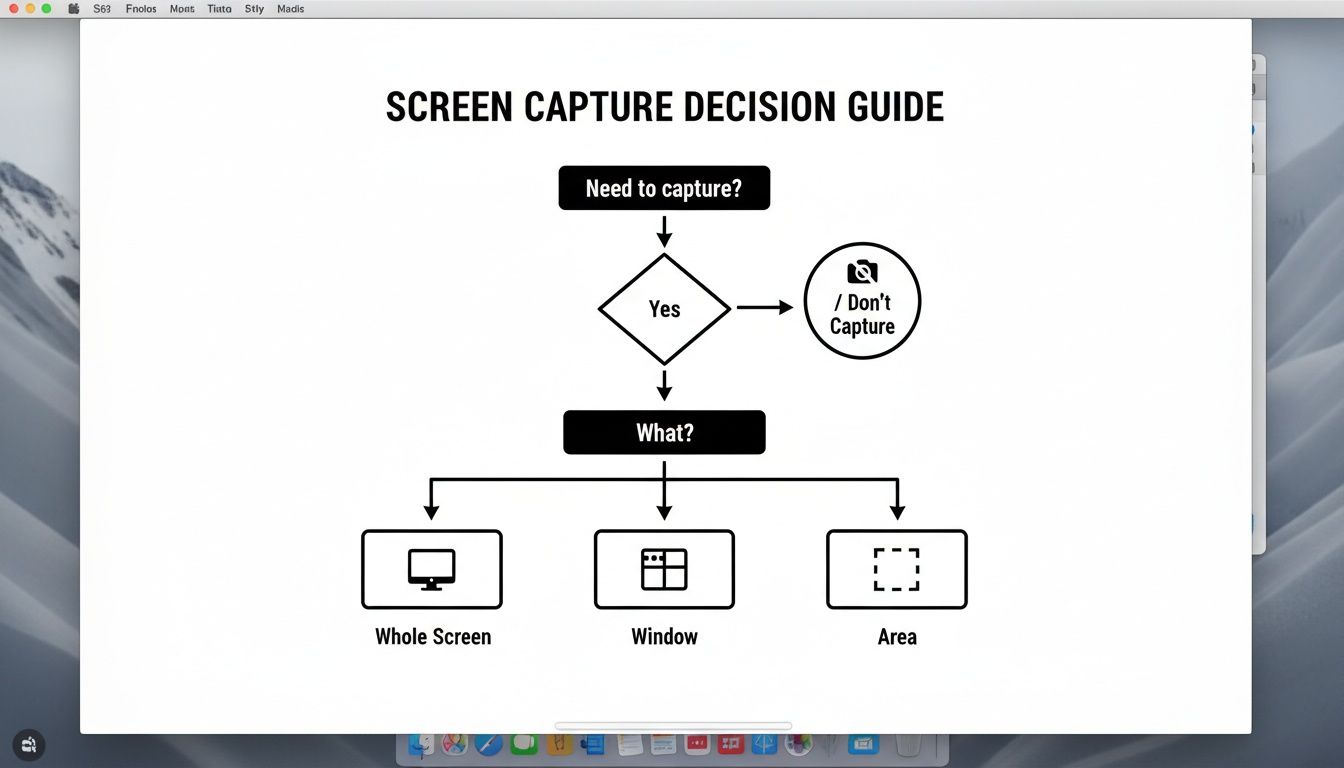
As you can see, it all comes down to what you’re trying to show. The flowchart walks you from a general idea to the exact command you need.
The ability to create clear visuals is more valuable than ever. In fact, the global market for screen capture software was valued at a whopping $9.58 billion in 2024 and is expected to nearly double to $18.25 billion by 2029. This boom is driven by the rise of remote work and digital content creation, where clear communication is critical. You can learn more about the growth of the screen capture software market and see just how essential these tools have become.
The bottom line is this: for most everyday tasks, you don't need fancy, complicated software. Committing a couple of simple shortcuts to memory will let you handle the vast majority of screenshot needs with the classic speed and efficiency of macOS.
Once you have these basics down, you can grab exactly what you need in an instant without breaking your concentration. These shortcuts will always be your quickest and most reliable option for static images, forming the foundation for the more advanced methods we'll explore next.
Which Native macOS Screen Capture Method Should You Use?
Deciding which built-in macOS tool to use can be tricky at first. This table breaks down the main keyboard shortcuts, what they do, and when you should use them.
| Method | Keyboard Shortcut | Best For | Output |
|---|---|---|---|
| Full Screen | Shift + Command + 3 | Capturing your entire desktop, including multiple monitors. | An image file of your whole screen. |
| Selected Area | Shift + Command + 4 | Grabbing a specific portion of your screen by clicking and dragging. | An image file of just the selected rectangle. |
| Specific Window | Shift + Command + 4 + Spacebar | Capturing a single app window or menu with a clean drop shadow. | An image file of the chosen window. |
| Screenshot App | Shift + Command + 5 | Accessing all capture options, including video recording. | An image or video file, depending on your choice. |
Think of this as your quick reference guide. The first three shortcuts are for speed, while the Screenshot App (Shift + Command + 5) gives you more control and options, including screen recording.
Recording Your Screen with Built-In macOS Apps

Sometimes a static image just doesn't cut it. When you need to show a process, demonstrate a workflow, or report a bug that only happens when you do this specific thing, a screen recording is worth a thousand screenshots.
Thankfully, your Mac has everything you need to start recording your screen right now, completely free.
The quickest way to get started is with a keyboard shortcut you're already familiar with: Shift + Command + 5. This command pulls up the same versatile screenshot toolbar, but this time we’ll focus on the video options. It's your one-stop shop for creating fast, effective screen recordings without ever leaving your workflow to open another app.
In the toolbar that appears, you’ll see icons for both capturing still images and recording video. The two icons with a small circle in the corner are your recording controls, making this little toolbar a powerhouse for all types of screen capture.
The Screenshot App vs. QuickTime Player
Your Mac actually gives you two native apps for screen recording: the Screenshot app (via the shortcut) and the classic QuickTime Player. While they essentially do the same job, they have subtle differences that might make one a better fit for your task.
- Screenshot App (Shift + Command + 5): This is my go-to for speed and convenience. It's perfect for firing off a quick tutorial for a coworker or capturing a bug in the act.
- QuickTime Player: This old-school app offers a little more control. A key feature I appreciate is that it shows you the recording's file size in real-time, which is incredibly handy when you're working on longer videos and need to keep an eye on storage.
To use QuickTime, you'll need to open the app from your Applications folder, head to the menu bar, and choose File > New Screen Recording. This launches a control panel that looks almost identical to the Screenshot app's, just housed inside a more traditional application window.
For the vast majority of day-to-day tasks, the Shift + Command + 5 shortcut is the clear winner. It keeps everything consolidated under one command and saves you the hassle of opening a separate program.
Essential Recording Options You Shouldn’t Skip
Before you hit that record button, take a second to dive into the "Options" menu. A couple of quick tweaks here can dramatically improve the quality and clarity of your final video.
Here’s what I always check:
- Set Your Audio Source: Click on "Options." Under the "Microphone" section, choose "Built-in Microphone" or any external mic you have connected. This is non-negotiable if you’re narrating a tutorial.
- Show Mouse Clicks: Make sure the "Show Mouse Clicks" option is checked. This adds a subtle, circular visual effect every time you click, making it much easier for your audience to follow along.
These two small adjustments can be the difference between a confusing video and a crystal-clear demonstration.
This focus on producing high-quality, polished output is why creatives and educators make up such a huge part of the screen recorder market. They rely on tools that feel like a natural extension of the Apple ecosystem. It's all about workflow efficiency, which fuels the demand for apps that do more than just basic screen capture on Mac. You can read more about these screen recorder market trends to see just how much macOS users are shaping the industry.
Making Your Screen Capture Workflow Actually Work for You
Taking a great screen capture on a Mac is just the start. The real magic—and where most people get bogged down—is in what happens next. How you manage, edit, and share those files can either be a seamless part of your day or a total time-waster. With a few simple tweaks, you can turn a messy process into a seriously efficient one.
Let's start with the biggest win: changing where your screenshots are saved. By default, every single capture lands smack on your Desktop. Before you know it, your clean workspace is buried under a mountain of files all named "Screen Shot..."
Here's the fix. Just press Shift + Command + 5 to pull up the Screenshot toolbar. Click "Options," and under the "Save to" menu, pick a dedicated folder. I have a folder called "Captures" tucked inside my Documents, which keeps everything organized and out of my way. Your Mac will remember this setting for all future screenshots and recordings. Easy.
Quick Edits and Smart File Management
Okay, your files are organized. Now, let's talk about optimizing them. MacOS saves screenshots as PNG files by default. That's great for quality, but the file sizes can be massive—not ideal for sharing on the web or through email. For most things, a JPG is a much more practical choice.
While you can change the default format with a Terminal command, a better approach is often just capturing the right dimensions from the start. If you're not sure what resolution you need for a specific platform or use case, a good screen resolution calculator can help you plan your captures and avoid creating unnecessarily large files.
For those moments when you need to add a quick note or highlight something, macOS has a fantastic built-in tool called Markup. When you take a screenshot, a little thumbnail pops up in the corner of your screen. Don't ignore it! Click it, and you're in Markup.
This is where a simple image becomes a powerful communication tool. Instead of sending a plain screenshot and then writing a long, confusing email to explain it, you can put all the context right on the image itself.
Markup is all about speed. It gives you the power to make essential edits without ever having to launch a separate app.
- Add text and arrows: Point out exactly what someone needs to see. I use this constantly for support tickets and step-by-step guides.
- Draw shapes: Use a circle or rectangle to draw immediate attention to a specific button or section of a UI.
- Crop and trim: Quickly get rid of distracting clutter around the edges of an image, or chop the beginning and end off a screen recording.
Mastering this quick-edit workflow is a game-changer. You'll spend way less time fussing with complex editing software and more time getting your point across clearly and effectively.
Upping Your Game: Creating Polished Demos with Advanced Techniques
The Mac’s built-in screen capture tools are fantastic for quick jobs and simple recordings. But there's a point where you need more firepower. When your goal isn't just to show your screen but to guide an audience through a compelling story, it's time to look beyond the native options.
This is exactly where specialized macOS apps like Screen Charm enter the picture. They’re built from the ground up to craft a guided visual experience that keeps viewers locked in and focused—an absolute must for creating professional product demos, in-depth tutorials, or crystal-clear onboarding guides.
Directing the Viewer’s Eye with Auto-Zoom
One of the biggest headaches with screen recordings is making sure people are looking at the right spot. You can frantically wiggle your mouse, but on a busy, high-resolution screen, your audience can easily get lost.
This is what makes a feature like auto-zoom so essential. Instead of spending hours in post-production manually zooming in and out—a truly tedious task—the software does the heavy lifting for you. It intelligently follows your cursor, zooming in on buttons, menus, and text fields as you interact with them. Your audience’s attention is always exactly where you need it to be, automatically.
That dynamic movement turns a flat, static recording into a presentation that's engaging and dead simple to follow.
Putting a Human Touch on Your Screen Capture
If you want your content to stick, you need to create a connection with your audience. Adding a personal touch can make a world of difference in viewer engagement and trust. Modern screen capture tools for Mac give you a few great ways to do this.
- Webcam Overlay: Popping a small video of yourself in the corner adds an immediate human element. Viewers can see your expressions and reactions, which makes a tutorial feel more like a personal, one-on-one session.
- Custom Cursors: You can easily change how your cursor looks to make it stand out or match your branding. Highlighting your clicks with a colored circle or ripple effect also gives a clear, satisfying visual cue for every action you take.
- Branded Backgrounds: Don't show off a messy desktop. Use a custom branded background instead. It creates a clean, professional aesthetic and reinforces your brand identity throughout the video.
The goal here is to graduate from a generic screen capture into a polished, branded asset that reflects the quality of your product or your teaching. Every small detail, from the cursor to the background, adds to that professional feel.
This need for more sophisticated features is what’s driving massive growth in the screen capture market, which is projected to expand at a CAGR of 15% from 2025 to 2033. This boom is all about the demand for tools with AI-powered features like intelligent zoom and automated editing. If you're just starting out, our guide on video editing tips for beginners is a great place to build your skills.
To get the most mileage out of your recordings, think about repurposing them. For instance, you can easily transcribe your video demos into text, making them searchable and accessible for people who prefer to read.
Dealing With Common Mac Screen Capture Glitches
Even on a Mac, things don't always go according to plan. You hit a familiar shortcut, and… nothing happens. It's frustrating, but the fix is usually simpler than you think. Let's dig into the most common macOS screen capture hiccups and how to solve them.
One day your keyboard shortcuts work perfectly, the next they don't. Nine times out of ten, this isn't a bug. It's usually a permissions issue or another app hijacking that key combination for its own function.
The first place to look is your System Settings. Head over to Keyboard > Keyboard Shortcuts > Screenshots. Here, you can quickly see if the default shortcuts are still active. If a box is unchecked, just check it again. If they're all checked but still unresponsive, you've likely got a conflict with another program, and you'll have to re-map the keys in that app's settings.
Sorting Out Audio and Video Issues
A silent screen recording is another classic problem. Many people are surprised to learn that macOS, by default, only records your microphone audio, not the sound coming from your apps. If you need to record both, check out our deep-dive on how to capture system audio on a Mac.
What if your mic audio is there, but it’s fuzzy or filled with background chatter? A little post-production magic can go a long way. Learning how to remove background noise is a game-changer for creating clean, professional-sounding recordings.
Sometimes, the capture itself just looks blurry, especially on a high-res Retina display. This often happens when the app you're recording has its own scaling settings. For the absolute crispest results, try to capture the application window at its actual, unscaled size.
Why You Can’t Screenshot Netflix
Ever tried to grab a still from a movie on Apple TV+ or a show on Netflix, only to end up with a useless black rectangle? That's not your Mac failing you; it's a security feature called Digital Rights Management (DRM) doing its job.
DRM is copy-protection technology built into streaming services and macOS itself. It's designed to stop people from illegally recording and sharing content. When the system detects you're trying to capture a DRM-protected window, it just blacks out the video.
This protection works for both still screenshots and screen recordings. There's no native way around it because it’s a core function meant to protect copyrighted material. So, if you're trying to capture your favorite show, you can stop looking for a fix—it's blocked on purpose.
Got Questions About Mac Screen Captures? We’ve Got Answers.
Even after you get the hang of the basics, you'll inevitably run into some specific quirks when capturing your Mac's screen. Knowing the answers to these common questions can save you a lot of headaches down the road. Let's dig into some of the things Mac users ask about most.
Probably the biggest question I hear is how to stop the Desktop from turning into a graveyard of old screenshots. Thankfully, the fix is simple and makes a huge difference in keeping things tidy.
Where Do My Mac Screenshots Go (And How Can I Change It)?
By default, every screenshot you take lands right on your Desktop. To point them somewhere else, just hit Shift + Command + 5 to bring up the Screenshot app's control bar.
Click on "Options." You'll see a "Save to" section where you can pick a different folder like "Documents" or choose "Other Location..." to select a custom folder you’ve made. Once you set this, your Mac remembers it for all future captures, keeping your workspace clean.
Another thing that trips people up is audio. It's a classic moment of confusion: you finish a screen recording, play it back, and realize there’s no sound from the app you were showing off.
How to Record Your Mac’s Screen with Internal Audio
Here’s the deal: macOS doesn't record your computer's internal audio out of the box. It’s a privacy thing. By default, it will only capture sound from an external input, like your microphone.
So, how do you record the sound from a video or an application? You'll need a little help from a third-party tool. macOS apps like Screen Charm have this built-in, and free utilities like BlackHole create a virtual audio device that lets you pipe system sounds directly into your recording.
Think of it like this: your Mac treats system sounds as a private conversation. To record that conversation, you need to plug in a "microphone" it trusts—and that's exactly what these third-party tools act as.
Finally, let's talk file formats. The one you choose can have a big impact on both quality and file size.
What’s the Best Format for Screenshots and Recordings?
Honestly, the "best" format really depends on what you're using the capture for.
By default, your Mac saves still images as PNG files. This is a fantastic choice for technical guides or tutorials where every pixel matters, since it’s a "lossless" format that preserves all the detail.
The downside? PNG files can be huge. If you need to email the image or post it online, switching to JPG is a great idea. You'll lose a tiny bit of quality from the compression, but the file size will be drastically smaller. For screen recordings, the standard MOV format your Mac uses is a solid all-rounder, giving you a great balance of high quality and compatibility, especially within the Apple ecosystem.
Ready to create product demos and tutorials that really stand out? Screen Charm gives you advanced tools like auto-zoom, webcam overlays, and a built-in editor to make your videos look polished and professional. Stop wrestling with the limitations and start making content that truly connects. Get Screen Charm today.