Master Your Cursor on macOS for Peak Productivity
On your Mac, the cursor is how you get things done. It’s the digital extension of your hand, translating your thoughts into actions on the screen. But it's more than just a simple arrow; it's the focal point of your entire experience, giving you constant feedback on where you are and what you're doing.
Why Your macOS Cursor is More Than Just a Pointer
Think of the cursor as your digital hand. It’s what you use to point, click, drag, and manipulate everything you see. But on macOS, its job goes way beyond basic navigation. It’s also a powerful communication tool, especially when you’re trying to guide someone's eyes during a presentation, a software tutorial, or a product demo.
A jerky, hard-to-see cursor can derail everything. If your audience can't follow your movements, your message gets lost, and they'll tune out. This guide dives into why the cursor is so central to the Mac experience and shows how it impacts both your own productivity and how clearly you can communicate with others.
The Cursor as a Communication Tool
For anyone who creates content on their Mac—developers, teachers, marketers, you name it—mastering the cursor is a total game-changer. It’s not just for you; it's for your audience. A big, clear, and smoothly moving cursor ensures that anyone watching can follow along without getting lost. A few simple tweaks can make a world of difference.
The cursor is the silent narrator of any screen recording. Its movements tell a story, and its visibility determines whether that story is clear and easy to follow or confusing and frustrating.
Unlocking a Better Workflow
Once you learn how to adjust your cursor’s appearance, behavior, and visibility, you can seriously upgrade your workflow and make your on-screen presentations far more effective. We'll cover everything you need to know about the cursor mac os, including:
- Customization: Adjusting size and color for perfect visibility.
- Responsiveness: Fine-tuning tracking speed for precision and comfort.
- Troubleshooting: Fixing common headaches like a freezing or disappearing cursor.
- Presentation: Enhancing the cursor for polished, professional screen recordings.
Taking a few minutes to get this fundamental tool just right will not only improve your daily Mac use but also elevate the quality of anything you create and share.
Customizing Cursor Size and Color in System Settings
Let’s be honest, the standard macOS cursor is fine, but it’s not exactly built to stand out. It’s small, subtle, and can easily get lost, especially if you’re working on a big monitor or trying to guide an audience through a screen recording.
Thankfully, Apple provides some fantastic built-in tools to make your cursor impossible to miss. These settings live within the Accessibility panel, but they're incredibly useful for anyone who wants to improve their day-to-day Mac experience. With a few quick adjustments, you can make your pointer pop against any background, whether it's a dense spreadsheet or a colorful design canvas.
Navigating to Cursor Accessibility Settings
First things first, you need to know where to find these controls. They're tucked away in System Settings, but the path is pretty direct once you know it.
Here’s how to get there:
- Click the Apple menu () in the top-left corner of your screen.
- Choose System Settings from the dropdown.
- In the sidebar on the left, scroll down and click on Accessibility.
- From there, find and select Display.
You’ve arrived! Inside the "Pointer" tab is where all the magic happens. This is your command center for customizing the look and feel of your macOS cursor.
Adjusting Pointer Size for Maximum Visibility
Probably the single most effective change you can make is bumping up the cursor size. A bigger cursor is just plain easier to follow, which means less time spent hunting for it and less strain on your eyes.
You'll see a simple Pointer size slider. Just drag it to the right, and you'll see a live preview of the cursor getting larger. You can dial it in to find what feels right for your screen size and workflow. For anyone creating tutorials or product demos, making the cursor even slightly larger is a game-changer for viewer clarity.
If you're looking for even more ways to tweak your pointer, you can learn more about how to change your mouse cursor on Mac in our detailed guide.
Choosing the Perfect Cursor Color Combination
Size is one thing, but color is what really creates contrast. A black cursor on a dark terminal window is practically invisible. Same for a white cursor on a blank document. This is where you can get creative and solve that problem for good.
You have control over two key elements:
- Pointer outline color: This sets the color of the cursor's border. A bright, high-contrast outline ensures it's visible no matter what's behind it.
- Pointer fill color: This is the inside of the cursor. You can stick with a classic white or black, or choose something vibrant like red or blue to really make it your own.
Pro Tip: Combining a larger size with a bold outline (like black) and a simple fill (like white) creates a cursor that’s practically impossible to lose. This simple tweak is a huge win for both personal accessibility and professional-looking demos.
To help you quickly find these options, here's a quick-reference table.
Key macOS Cursor Customization Settings
This table breaks down the main native settings in macOS for changing your cursor's look and feel for better visibility.
| Setting | Path in System Settings | What It Does |
|---|---|---|
| Pointer size | Accessibility > Display > Pointer | Increases or decreases the overall size of the cursor using a simple slider. |
| Pointer outline color | Accessibility > Display > Pointer | Changes the color of the border around the cursor to improve contrast against various backgrounds. |
| Pointer fill color | Accessibility > Display > Pointer | Sets the interior color of the cursor, allowing you to make it stand out. |
| Shake mouse pointer to locate | Accessibility > Display > Pointer | Temporarily enlarges the cursor when you shake the mouse or trackpad, helping you find it on a busy screen. |
These built-in features give you a surprising amount of control right out of the box.
One last thing—don't overlook the "Shake mouse pointer to locate" feature, found in the same section. If you ever do lose track of your pointer, a quick shake of the mouse makes it balloon in size for a moment. It's a simple but brilliant little feature that can save you a ton of frustration.
Fine-Tuning How Your Cursor Moves and Feels
Looks are one thing, but how your cursor feels is where the magic really happens. The way the pointer glides across your screen in response to your hand can be the difference between a smooth, intuitive workflow and a clunky, frustrating one. When you get this right, the cursor stops being just a pointer and starts feeling like an extension of your own hand.
The secret sauce behind this is a feature called Pointer acceleration. It intelligently changes your cursor's speed based on how fast you're actually moving your mouse or trackpad. Think of it like a car's gas pedal: a slow, gentle push gives you fine-tuned control for delicate work, like trimming a video clip or selecting a single character of text. But a quick, sudden stomp on the gas sends you flying down the road. Same idea here—a quick flick of the wrist sends the cursor zipping across the screen exactly where you want it.
This smart system gives you the best of both worlds: sweeping gestures and pixel-perfect precision, all without ever touching a single setting. It’s a core part of the cursor mac os experience, built to adapt to what you’re doing in real-time.
Getting a Grip on Pointer Acceleration
Pointer acceleration is one of those brilliant features that works so well you probably don't even notice it's there. Instead of a rigid 1:1 relationship—where moving your mouse one inch always moves the cursor a set distance—acceleration adds a dynamic multiplier. The faster you move your hand, the farther the cursor travels on screen.
It’s incredibly efficient. You can cross a massive 27-inch monitor with a tiny wrist movement, yet still have the steady control needed to click a tiny icon by moving slowly. For designers, programmers, or anyone who lives and breathes pixel-perfect accuracy, dialing in this behavior is everything.
Finding Your Sweet Spot with Tracking Speed
While macOS doesn’t give you a simple on/off switch for acceleration, you have a powerful lever to control it: Tracking speed. This is your main dial for tuning how sensitive the cursor is to your movements. You’ll find it in a couple of different spots depending on what you're using:
- For an external mouse: Head to System Settings > Mouse > Tracking speed.
- For the built-in trackpad: Go to System Settings > Trackpad > Point & Click > Tracking speed.
Cranking this slider up makes the cursor feel zippier and amplifies the acceleration effect—great for navigating big screens or multiple monitors. Sliding it down does the opposite, giving you a more direct, predictable feel that's perfect for detailed design work.
Finding the "right" tracking speed is completely personal. I always tell people to start in the middle. Use your Mac for a bit. If you keep flying past your targets, nudge it a little slower. If it feels like you're dragging the cursor through molasses, speed it up.
Taking a few minutes to experiment with this one setting is the single best thing you can do to make your Mac feel truly yours. A well-tuned cursor moves exactly as you expect, making every interaction feel more natural and efficient. It’s a small time investment that pays off every single day.
Solving Common macOS Cursor Problems
Nothing brings a productive workflow to a grinding halt faster than a misbehaving cursor. When your pointer starts to freeze, jump around erratically, or just disappear altogether, it's more than a minor annoyance—it can completely derail what you're doing.
The good news is that most cursor glitches on macOS have surprisingly simple fixes. We'll walk through the most common problems and their solutions, starting with the easy stuff and moving on to the more involved system resets. Think of it as a clear plan to get your digital hand working properly again.
The First Line of Defense: Simple Fixes
Before you start digging around in system settings, always check the basics. You'd be surprised how often these simple steps solve cursor issues, especially if you're using a wireless mouse or trackpad.
-
Check Your Batteries: If you're using a wireless device like the Magic Mouse, a low battery is suspect number one. A weak power source often causes the connection to drop, which feels like a laggy or totally unresponsive cursor.
-
Verify Your Connection: For Bluetooth devices, pop open System Settings > Bluetooth and make sure your mouse is actually connected. Sometimes, just toggling Bluetooth off and on again is all it takes to force a stable handshake.
-
Rule Out Surface Issues: An optical or laser mouse can get confused by shiny, reflective, or transparent surfaces like a glass desk. If you’re seeing jerky movements, try a mouse pad or even just a piece of paper to see if the problem vanishes.
These quick checks are your first filter. They help you quickly rule out any external hardware problems before you start tweaking software.
When Software is the Culprit
If the hardware checks out, the problem is likely hiding somewhere in macOS or a specific app you're running. A system that's struggling for resources or dealing with a software conflict can easily cause cursor lag or freezing.
One of the biggest offenders here is runaway memory usage. It’s become a significant issue for some macOS applications, with a few documented cases showing just how extreme it can get. For example, one report from a user on a MacBook Pro with an M4 Max chip detailed an app consuming over 100GB of memory. That’s more than 150% of the machine's total RAM, which is bound to cause system-wide instability. You can read more about these macOS memory performance findings to get a sense of how badly this can destabilize a Mac.
Once you've sorted out any underlying performance issues, this decision tree can help you fine-tune your cursor's feel.
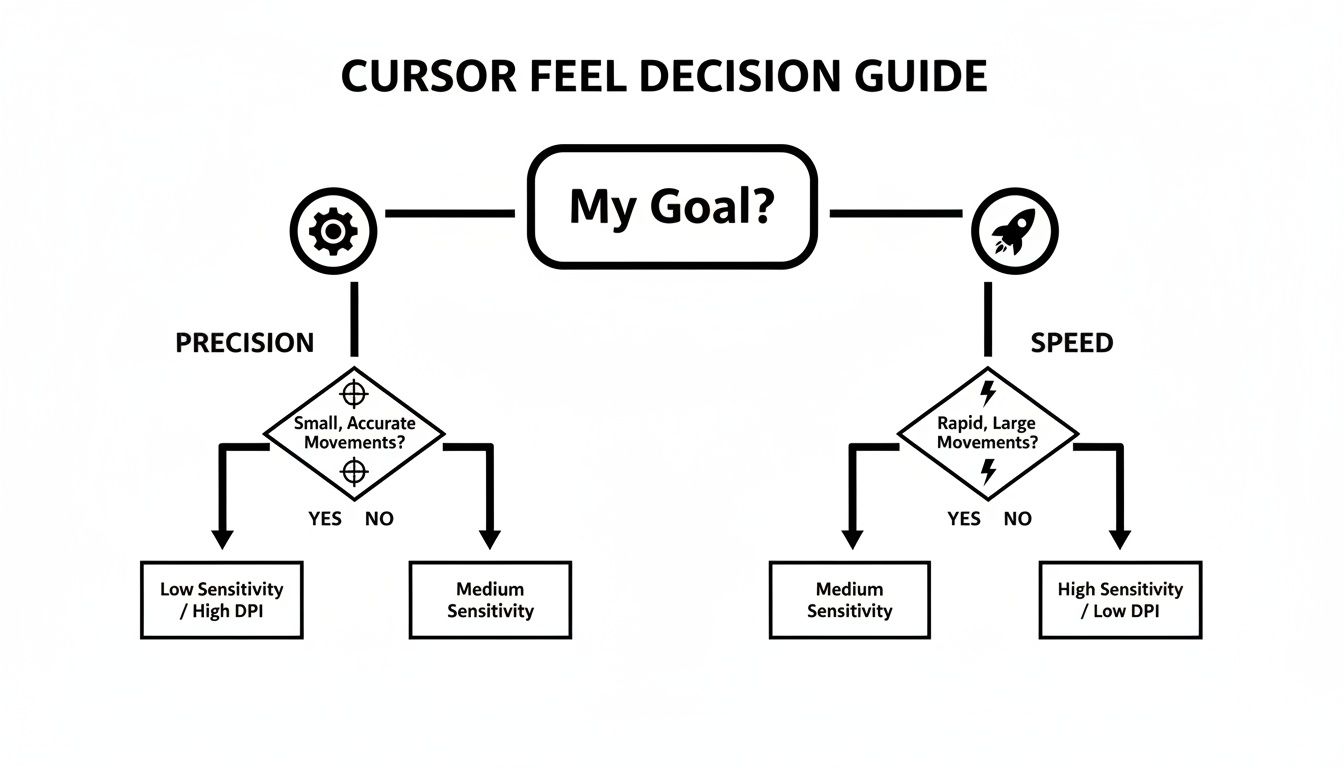
This guide helps you strike the right balance between moving quickly across large screens and having the fine-grained control needed for detailed work.
Advanced Troubleshooting Steps
When the simple fixes don't cut it, it’s time to look at some deeper, system-level solutions. These methods are designed to tackle persistent bugs that a simple restart won't solve.
A common but often overlooked cause of cursor issues is conflicting third-party software. Utilities that modify system behavior, like window managers or accessibility tools, can sometimes interfere with how macOS handles pointer input.
If you're still stuck, give these more powerful solutions a try:
-
Reset NVRAM/PRAM: This is where your Mac stores certain settings that need to stick around even when it's off. If this data gets corrupted, it can lead to all sorts of strange hardware behavior, including cursor problems. The reset process involves holding a key combination during startup and varies depending on your Mac model.
-
Reset the SMC: On Intel-based Macs, the System Management Controller (SMC) is in charge of low-level functions like power and fans. Resetting it can be a cure-all for a wide range of quirky hardware bugs.
-
Identify Resource-Hungry Apps: Open up Activity Monitor (you'll find it in Applications > Utilities) and look for any apps eating up an unusual amount of CPU or memory. Quitting a runaway process is often all it takes to get your cursor back to normal instantly.
By working through these steps—from simple hardware checks to deeper system resets—you can diagnose and solve just about any common issue affecting your cursor mac os experience and get back to a smooth, predictable workflow.
Creating Flawless Demos with an Enhanced Cursor
When you're recording a product demo or a tutorial, your cursor is so much more than a simple pointer. It’s your main communication tool, the digital equivalent of you pointing a finger to say, "Look here." The problem is, the standard cursor mac os provides is intentionally subtle; it’s designed to stay out of the way. But for someone watching your recording, that subtlety can quickly become a real headache as they try to follow along.
A small, faint cursor can easily vanish against a busy interface or a colorful background. This forces your audience to spend their mental energy just trying to spot your pointer, pulling their focus away from what you’re actually trying to teach them. Making your cursor more visible is one of the simplest yet most powerful things you can do to create a clear, professional recording that's easy to follow.

Why a Visible Cursor is Non-Negotiable
Think of your cursor as the star of the show. Every move it makes tells the viewer’s eye exactly where to go and what to pay attention to. A bold, prominent cursor acts like a silent narrator, ensuring your audience sees every click, drag, and menu selection without any guesswork.
Without that clear visual guide, it’s easy for viewers to miss a critical step, leading to frustration and causing them to tune out. We know from studies on learning that clear visual cues are absolutely essential for retention. That’s why a highly visible cursor isn't just a nice-to-have; it's a core component of effective instructional content. You can dive deeper into these kinds of strategies in our guide on screen recording for tutorials.
Techniques to Make Your Cursor Stand Out
To really make your cursor work for you, you’ll need to go beyond the basic system settings. This is where dedicated screen recording software comes in, offering features built specifically for this purpose. Finding the right tool is a great first step, and there are many excellent options out there, including some of the best free online screen recorders that can get you started.
These tools typically offer a few key ways to enhance your cursor:
- Click Highlighting: This feature adds a visual pop—like a colored circle or a ripple effect—every time you click. It’s an unmistakable signal that you’ve performed an action, which is perfect for demonstrating software workflows.
- Pointer Magnification: Some tools let you temporarily magnify the area right around your cursor. This is ideal for drawing attention to tiny checkboxes, icons, or menu items that might otherwise get lost on the screen.
- Custom Cursor Icons: Why stick with the standard arrow? You can often replace it with a custom icon that's more eye-catching or even branded to your company, adding a layer of polish to your videos.
These enhancements mean you don't have to waste time in post-production adding manual callouts or zoom effects. Instead, you build that clarity right into the recording from the start.
By making your cursor the focal point of your recording, you're not just showing what you're doing—you're actively guiding your audience's attention. This simple shift transforms a passive viewing experience into an active learning one.
Choosing the Right Tools for Professional Results
While macOS lets you tweak the cursor’s size and color, creating a truly polished demo often requires more firepower. This is exactly why applications like Screen Charm were created.
Screen Charm gives you total command over your cursor’s look and feel. You can swap out the icon, dial in the perfect size, and add click effects that make every interaction perfectly clear. Even better, its signature auto-zoom feature intelligently follows your cursor's movement, automatically zooming in on the parts of the screen you're interacting with. This dynamic effect keeps your viewers focused on what matters most, creating a slick, professional presentation without any extra editing work on your part.
Unlock Your Mac's Full Potential Through the Cursor
We've covered a lot of ground, but it all circles back to a simple idea: the macOS cursor is so much more than a pointer. It's your silent partner, a central hub for productivity, accessibility, and clear communication in everything you do.
We've walked through the essentials, from tweaking its look in System Settings for better visibility to dialing in its motion so it feels just right. We also tackled how to fix those annoying cursor glitches and underscored why a clear, easy-to-follow cursor is a game-changer for professional screen recordings.
Taking control of this small but mighty tool doesn't just improve your own day-to-day workflow. It also helps you create content that’s significantly clearer and more engaging for anyone watching. The power to refine your entire Mac experience is, quite literally, at your fingertips.
Bringing It All Together
Mastering your cursor is one of those foundational skills that pays off everywhere. A well-configured cursor means less eye strain, faster navigation, and on-screen actions that are crystal clear to your audience.
To really get the most out of your Mac, think about how your souped-up cursor fits into the bigger picture. Pair it with broader Mac productivity tips and you'll streamline your entire workflow, turning your Mac into a machine that feels truly built for you.
And don't forget, the built-in settings are just the beginning. If you're ready to move beyond basic size and color adjustments, our guide to create a custom cursor can show you how to take things to a whole new level.
In the end, every little tweak you make—from a simple color change to a sophisticated recording effect—adds up to a smoother, more intuitive experience. You’re not just changing a setting; you’re investing in a more efficient and enjoyable way to work.
Your Top Questions About the macOS Cursor, Answered
Even with all the options we've covered, you might still have a few questions about how the macOS cursor works day-to-day. Let's tackle some of the most common ones that come up.
How Do I Make My Mac Cursor Bigger Permanently?
You can absolutely make your cursor bigger for good, and it's a simple fix right in the Accessibility settings.
Just head over to System Settings > Accessibility > Display. From there, you'll see a "Pointer" tab with a Pointer size slider. Adjust it to whatever size feels comfortable, and you're all set. macOS saves this preference, so it'll stick around even after you restart your computer. No more resizing every time you log in.
Why Does My Cursor Keep Disappearing on My Mac?
A vanishing cursor is a classic Mac quirk, and it usually isn't anything serious. Most of the time, it's just a temporary glitch, a conflict with an app running in full-screen mode, or a spotty Bluetooth connection to your mouse. The quickest fix? Just shake your mouse or wiggle your finger on the trackpad to trigger the "Shake mouse pointer to locate" feature.
If you find it's happening a lot in one specific program, try quitting and reopening that app. If the problem is system-wide, a good old-fashioned restart will almost always clear things up.
Here's a pro-tip: a disappearing cursor can also be a sign that your Mac is struggling for resources. If you notice it happening when your machine is chugging along, pop open the Activity Monitor and see if any app is hogging all the CPU or memory.
Can I Use a Custom Image for My Mac Cursor?
Out of the box, macOS doesn't let you swap the standard arrow for a custom image file like a PNG or JPG. The built-in options are all about changing the size and color of the existing pointer, as we discussed earlier.
That said, some third-party apps can do this for purely cosmetic reasons. But for content creators, a more practical solution comes from screen recording tools. Many of them let you overlay a custom image or branded icon onto your cursor in the final video, which is a fantastic way to keep your branding consistent and make sure your viewers never lose track of the action.
What Is Pointer Acceleration and Should I Disable It?
Pointer acceleration is a clever macOS feature that changes how your cursor moves based on how fast you move your hand. Move your mouse slowly, and the cursor crawls for precision work. Whip it across the desk, and the cursor flies across the screen. It's designed to give you both fine control and broad, quick navigation.
For most people, this just feels natural. However, if you're a graphic designer, a video editor, or a serious gamer, you might prefer a more direct, 1:1 relationship between your hand's movement and the cursor's.
There isn't a simple on/off switch for this in System Settings. You can tone it down by adjusting the Tracking speed, but turning it off completely involves using Terminal commands. That's really only recommended for power users who need absolute, predictable precision for their work.
Ready to create tutorials and demos with a cursor that truly captivates your audience? Screen Charm gives you all the tools you need to highlight clicks, auto-zoom on key actions, and customize your cursor for professional-grade screen recordings. Stop letting your cursor get lost and start guiding your viewers with clarity and style. Discover how Screen Charm can transform your videos today.