Create Software Tutorials That Engage and Educate on macOS
Want to create software tutorials that people actually watch and learn from? It all starts before you even think about hitting the record button. The best tutorials are built on a solid foundation—a clear blueprint that maps out your audience, your goal, and the entire process from start to finish.
This prep work is the secret sauce. It's what separates a confusing, rambling video from a crisp, helpful one.
Building Your Tutorial Blueprint Before You Record
Let’s be honest, the magic of a great software tutorial isn't in the fancy editing; it's in the careful planning that happens beforehand. Before you fire up your screen recorder on your Mac, you need a clear game plan. This is where you figure out exactly who you’re talking to and what you want them to walk away knowing. Nailing this foundation helps you avoid the common mistakes that make viewers click away.
Taking this strategic approach is more important than ever. The demand for eLearning resources has exploded by a massive 3,600% since 2019, showing just how hungry people are for quality online training.
This simple flowchart breaks down the planning process into three core phases:
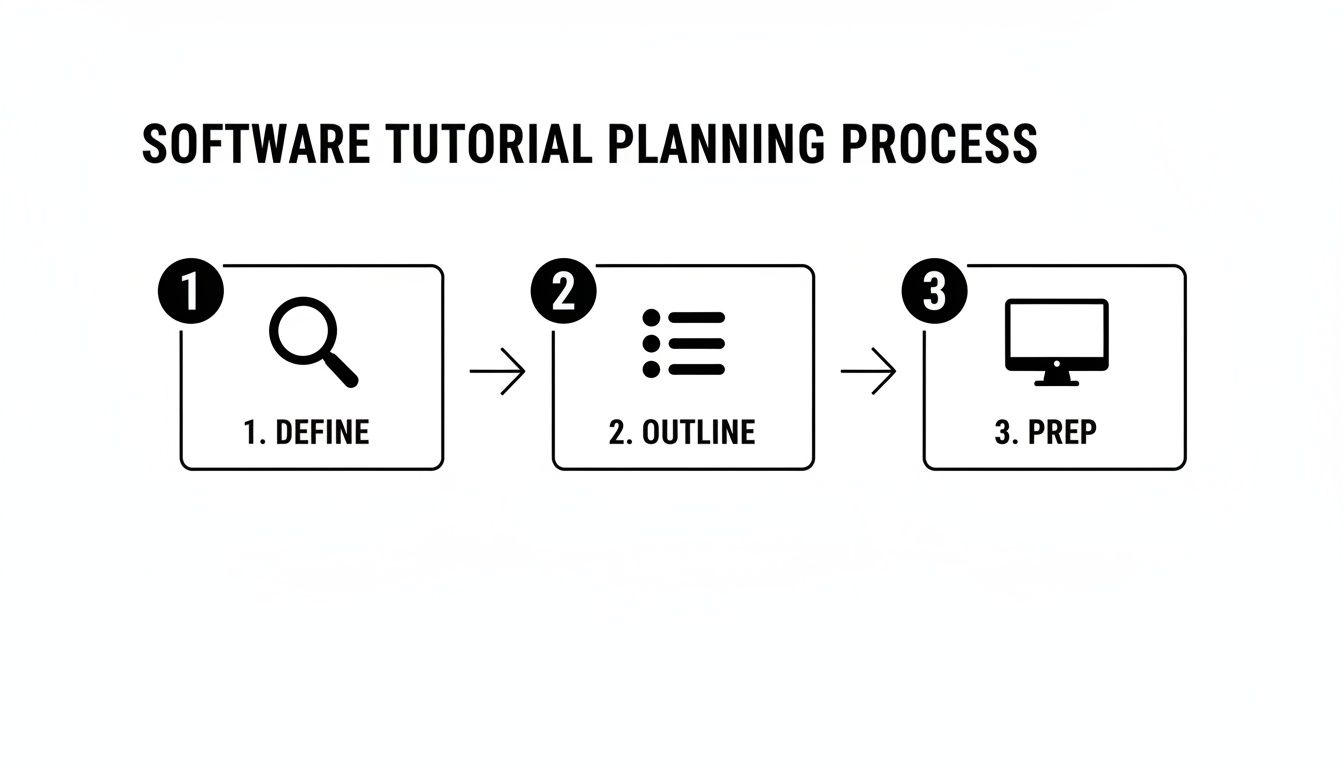
As you can see, success starts with getting clear on your audience and goals. Only then should you move on to outlining the steps and prepping your recording setup.
Define Your Audience and Objective
First things first: who is this for? Is it for a total beginner who needs every single click explained? Or are you teaching a power user an advanced shortcut? Knowing your audience shapes everything—your tone, your pacing, and how deep you need to go. If you try to teach everyone at once, you'll end up connecting with no one.
Once you know who you're talking to, give them a single, razor-sharp learning objective. What is the one thing they will be able to do after watching your video?
- Bad Objective: "Show users how to use the software." (Way too broad.)
- Good Objective: "Teach a new Mac user how to create their first project in Pages and export it as a PDF." (Specific, actionable, and measurable.)
A tutorial with a singular focus is far more effective. When a viewer can walk away with a tangible new skill, they feel a sense of accomplishment and are more likely to trust your future content.
Outline Your Tutorial Flow
With a clear objective in mind, it's time to map out the content. You don't need anything fancy; a simple storyboard or a bulleted list in Notes works perfectly. Just lay out each step in a logical sequence, from the very beginning to the final result. Think of it like giving directions—you wouldn't start with the final turn.
For instance, if you're teaching someone to export a PDF from a macOS app, your outline might look something like this:
- Intro: Quickly state the video's goal.
- Open the App: Show how to launch it from the Dock or Launchpad.
- Create New Document: Walk through the initial setup.
- Add Content: Demonstrate the basic actions needed.
- Find the Export Menu: Show them exactly where to click in the menu bar.
- Choose PDF Settings: Explain the most important options in the macOS save dialog.
- Save the File: Confirm the final step.
- Outro: Briefly recap what they've learned.
If you want to go deeper into structuring educational content like a pro, check out our guide on how to create training videos that actually work.
Scripting and Environment Prep
Next up is scripting. Even a simple script can be a lifesaver, keeping you on track and preventing you from rambling. It doesn’t have to be a word-for-word manuscript, but jotting down your key talking points ensures you cover everything you need to without getting sidetracked. Pro tip: read it out loud to make sure it sounds natural.
Finally, get your macOS desktop ready for its close-up. A clean, distraction-free screen is non-negotiable.
- Close every unnecessary app and browser tab.
- Turn on a Focus mode (like Do Not Disturb) from the Control Center to kill all notifications.
- Set your desktop wallpaper to something neutral and clean.
This quick cleanup makes your tutorial look instantly more professional and helps your viewer focus on what matters: the software you're teaching. To get the full picture on producing engaging educational content, learn how to create training videos that actually work.
Your Tutorial Pre-Flight Checklist
Before you hit record, run through this quick pre-flight checklist. It’s a simple way to make sure you’ve covered all your planning bases, setting you up for a smooth and professional recording session from the get-go.
| Planning Step | Key Action | Why It Matters |
|---|---|---|
| Audience Profile | Define your ideal viewer's skill level and background with macOS. | Tailors the content's depth, pace, and language to be maximally effective. |
| Learning Objective | Write a single, clear, and measurable goal for the tutorial. | Provides a sharp focus for the video and a clear "win" for the viewer. |
| Content Outline | Create a step-by-step list of the entire process you'll show. | Ensures a logical flow and prevents you from missing crucial steps. |
| Scripting | Draft key talking points or a full script for your narration. | Keeps your commentary concise, on-topic, and professional. |
| Environment Prep | Clean your Mac desktop, close apps, and enable Focus mode. | Creates a distraction-free viewing experience and looks polished. |
Once you’ve checked off these items, you're not just ready to record—you're ready to create a tutorial that truly helps someone.
Getting the Perfect Screen Recording on Your Mac
With your plan nailed down, it's time to hit record. Capturing your screen on a Mac is more than just grabbing a video of your desktop; you're creating a visual story that has to guide your viewer's eye with total clarity. The quality of this raw footage is everything—it determines how easy your tutorial is to follow and how professional the whole thing feels.
Great tutorials are built on clean, intentional screen captures. The goal isn't just to show what you're doing but to make it impossible for your audience to get lost. That means picking the right macOS tools and techniques from the get-go.
Choosing Your macOS Recording Tool
Sure, your Mac has a built-in screen recorder—QuickTime Player. It’s fine for a quick, no-frills capture. It's free, it's already there, and it gets the job done in a pinch. But when you create software tutorials regularly, leaning on QuickTime often means signing yourself up for a ton of extra work in the editing room.
This is where specialized Mac apps come in. They're designed specifically to solve the problems tutorial creators face, building in features that direct the viewer's focus automatically. That translates directly into less time spent editing.
| Feature | QuickTime Player (Native) | Specialized Tutorial App (e.g., Screen Charm) |
|---|---|---|
| Cursor Highlighting | Not available. You have to add effects manually in post-production. | Built-in, customizable highlights make the cursor impossible to lose. |
| Automatic Zoom | Nope. All zooming has to be added by hand during the edit. | Intelligently zooms in on clicks and UI elements as you record. |
| Webcam Integration | Records your webcam feed as a separate file, which you have to sync up later. | Records screen and webcam together as perfectly synchronized layers. |
| Integrated Editing | You can only do basic trims. | A full-featured editor is included for refining zooms, making cuts, and adding assets. |
While QuickTime is a handy utility, a dedicated tool is an investment that pays for itself in saved time and a much more polished final product. For a deeper dive, check out our guide on how to screen record on a Mac.
Make Your Cursor the Star of the Show
In a software tutorial, your cursor is the main character. It's the pointer telling your audience, "Look here! Now click this!" A tiny, standard cursor that gets lost on the screen is a surefire way to frustrate viewers and have them constantly scrubbing back.
One of the easiest and most impactful upgrades you can make is to customize your cursor.
- Make it bigger: A slightly larger cursor is dramatically easier to follow without being obnoxious.
- Give it a highlight: A colorful circle or "halo" around the cursor ensures it stands out against any background, light or dark.
- Show your clicks: Adding a visual effect for left and right clicks confirms to the viewer that an action happened, leaving zero room for doubt.
These small tweaks transform the cursor from a simple pointer into an active teaching tool, keeping your audience locked in on the right part of the screen at all times.
Dynamic Zooming Will Save You Hours
Ever watched a tutorial and had to squint to see which tiny menu option the person was clicking? This is the exact problem dynamic zooming solves. Instead of recording your entire screen and then painstakingly adding manual "punch-in" effects later on, the right tool can handle this for you automatically.
By automatically magnifying key interface elements as you interact with them, dynamic zoom ensures your viewers never miss a critical step. This single feature can eliminate the most tedious part of the editing process.
Think about it: you click a small icon in a packed toolbar. An intelligent macOS recorder will smoothly zoom in on that icon, hold for a moment, and then zoom back out as you move to the next step. The motion feels completely natural and directs attention exactly where it needs to be, giving you a pro-level result with zero manual effort. It’s a foundational technique to create software tutorials that are both clear and engaging.
Nailing Your Narration as You Record
Your voiceover is just as crucial as your video. Muffled, unclear, or distracting audio can sink an otherwise perfect tutorial. While you can always record your audio separately, I've found that capturing it during the screen recording session leads to a much more natural and synchronized delivery.
Here are a few tips I've picked up for getting clean narration from the start:
- Get an External Mic: Your Mac's built-in microphone is going to pick up every keyboard click, fan noise, and room echo. A simple USB microphone is the single biggest upgrade you can make to your audio quality.
- Position It Properly: Don't stick the mic directly in front of your mouth. Place it slightly off to the side to avoid those harsh "plosive" sounds—the puffs of air from "p" and "b" words that can distort the audio.
- Speak with Confidence: Talk a little slower than you would in a normal conversation and make sure to enunciate. You're the guide here, so your voice should project clarity and confidence. Having a simple script with bullet points can keep you on track without making you sound like a robot.
Editing: Turning Raw Footage into a Polished Tutorial
Once you stop recording, the real magic begins. The editing room is where your raw macOS screen capture transforms from a simple recording into a clear, professional, and easy-to-follow tutorial. This isn't about adding flashy, Hollywood-style effects; it's about refining what's already there to create a seamless learning experience for your audience.
You’re essentially taking the automated brilliance from your recording—like the dynamic zooms and cursor highlights—and giving it a final, human touch. This is how you ensure every single step is crystal clear.
Fine-Tuning the Automated Magic
Modern macOS screen recorders like Screen Charm do a fantastic job of automatically zooming in on your clicks, but think of that as a really good first draft. Your job in the edit is to perfect the timing and focus, essentially becoming the director of your viewer's attention.
For example, the software might zoom in the exact moment you click. But what if you wanted to build a little anticipation? You can adjust the zoom to start a half-second before the click. You can also tweak the zoom speed or hold the magnification on a critical menu item for an extra beat. It’s this level of control that separates a decent tutorial from a truly great one.
Your main goal in the edit is to eliminate any chance of confusion. By finessing the zooms and pacing, you’re guiding the viewer’s eye exactly where it needs to be, right when it needs to be there.
Weaving in Your Webcam and Brand
Seeing your face helps build a genuine connection, but a constant picture-in-picture box can be a major distraction during a complex technical walkthrough. The key is to be strategic.
I've found the best approach is to use webcam footage for specific moments:
- The Welcome: Start the video with a friendly, full-screen intro. It sets a personal tone before you even get to the software.
- The Wrap-Up: Reappear at the end to summarize the key points and give a clear call to action.
- The "Why": When you need to pause the on-screen action to explain a high-level concept, switching back to yourself is a great way to break things up and re-engage your audience.
This lets the software be the star of the show when it needs to be, while your presence adds that crucial human element. Many Mac editing tools also let you pop in a branded background for your webcam, which adds a layer of professionalism without needing a perfect green screen setup. For a deeper dive, check out our guide on simple video editing for Mac.
Adding Callouts and Annotations
Even with perfect narration, a little visual reinforcement goes a long way. This is where simple text callouts and annotations become your secret weapon. You don’t need complex motion graphics; a few well-placed visual cues can make all the difference.
Here’s how I like to use them:
- Keyboard Shortcuts: Any time you mention a shortcut like Command + S, throw that text on the screen for a moment. People remember what they see and hear.
- Labeling UI: If you're pointing out a specific, maybe obscure, button for the first time, a simple arrow with a text label clears up any doubt.
- Highlighting Values: Typing a specific hex code, command, or number? Put it in a clean text box on screen to ensure no one mishears or misreads that critical piece of information.
These little additions are like signposts, guiding your viewer’s attention and cementing the most important parts of the lesson.
Creating a Seamless Flow
The final pass is all about polish. This is where you hunt down all the little things that can make a video feel clunky or amateur. The goal is a smooth, confident delivery that keeps people watching.
First, be ruthless in cutting out filler words. We all say "um," "ah," and "you know" when we speak, but snipping them out of the final video makes you sound far more authoritative. Trim out any long, dead-air pauses where you were thinking or navigating, too. The pacing should feel intentional, not sluggish.
And don't be afraid of the jump cut! If you mess up a step and have to do it again, just cut from the moment before the mistake to the successful attempt. As long as the on-screen action flows logically, your viewers won't even notice. This kind of trimming is essential when you create software tutorials—it respects your viewer's time and keeps the energy up, resulting in a video that feels effortless and professional.
You’ve got the core of your tutorial edited down. The steps are clear, the timing is right. Now, let’s talk about the polish—the little things that take a tutorial from "good enough" to genuinely great.
This is where you can really set your content apart. It's about more than just showing someone how to do something; it’s about creating a professional, engaging experience that makes people want to come back for more. Small details in audio, navigation, and visual appeal make a massive difference in how your audience perceives your work, especially when you create software tutorials on your Mac.
Let AI Handle the Tedious Stuff
Artificial intelligence isn't just a buzzword; for creators, it's like having a hyper-efficient assistant. The adoption rate speaks for itself, with 84% of developers already using or planning to use AI tools. For us tutorial creators, this translates into huge time savings on tasks that used to be a real slog. You can check out the latest software development statistics to see just how deeply AI is shaping the industry.
Here's how AI can take over the heavy lifting:
- Automated Subtitles: Getting accurate, time-synced subtitles used to take hours. Now, it's often a one-click process. This instantly makes your content more accessible to everyone, from non-native speakers to people watching with the sound off.
- Script Polishing: AI can be a great second pair of eyes on your script. It can help you find and fix clunky sentences, ensuring your delivery sounds natural and confident.
- Silence Removal: We all have those moments where we pause a bit too long. AI tools can automatically find and snip out those awkward gaps, tightening up the pace and keeping your tutorial energetic.
Use Chapter Markers to Guide Your Viewers
If your tutorial is on the longer side, chapter markers are an absolute must. They’re essentially a table of contents for your video, letting viewers see the entire lesson at a glance and jump straight to the part they actually need.
Think about it: this is a massive sign of respect for your viewer’s time. Instead of making them hunt through a 15-minute video to find a 30-second answer, you’re giving them a direct path. On platforms like YouTube, these timestamps automatically create chapters, dramatically improving the whole experience.
Adding chapter markers turns a linear video into a searchable resource. This small effort drastically increases the long-term value and re-watchability of your content, as viewers can easily return to specific sections later.
Design Thumbnails That Get the Click
Your thumbnail is your video's billboard. It's the first impression and often the only thing that determines whether someone clicks your tutorial or just keeps scrolling. A great thumbnail needs to be clear, compelling, and an honest preview of what's inside.
You don't need to be a graphic designer to make something effective on your Mac. Here’s a simple formula that just works:
- Start with a clean screenshot: Grab a high-contrast, easily recognizable shot from the software you're teaching.
- Add big, bold text: A few words saying exactly what the video does (e.g., “Export Your First PDF”) is all you need.
- Include your branding: A consistent logo or color scheme helps people recognize your work and builds your brand over time.
The key is to avoid clutter. The goal is instant understanding.
"Sweeten" Your Audio for a Pro Sound
I can't stress this enough: bad audio will kill a good video. If your voiceover is muffled, quiet, or full of background hum, people will click away in seconds, no matter how great your screen recording is. The good news is you don't need a fancy studio to get clean audio.
A few post-production tweaks, often called "audio sweetening," can make a world of difference:
- Noise Reduction: Almost every Mac video editor has a simple tool to remove that low-level hum from your computer fan or AC unit. Use it.
- Volume Normalization: This process ensures your audio levels stay consistent, so your viewers aren't constantly reaching for the volume dial.
- Equalization (EQ): Don't be intimidated by the term. A simple EQ preset can add a bit of crispness and clarity to your voice, making it much more pleasant to listen to.
Spending just five minutes on these audio touch-ups will immediately elevate the perceived quality of your entire tutorial.
Publishing and Promoting for Maximum Reach
Creating a killer tutorial is only half the job. Now, you’ve got to get it in front of the right people. Once your video is polished and ready to go on your Mac, you're stepping into the crucial publishing and promotion phase. This is where all your hard work pays off, turning your tutorial into a discoverable asset that genuinely helps people and builds your reputation.
This isn't just about hitting the "upload" button and hoping for the best. It takes a smart approach to video SEO and distribution to make sure your tutorial doesn't just fade into the background noise. Taking these final steps seriously is how you'll get the biggest return on your effort.
Getting Your Tutorial Discovered
Think of platforms like YouTube as massive search engines, but for video. If you want people to find your tutorial, you have to feed the algorithm the right signals. That all starts with your video's metadata.
Your title is your single most important piece of real estate. It needs to be descriptive, packed with the right keywords, and tell someone exactly what they're about to learn.
- Weak Title: "Software Demo"
- Strong Title: "How to Create Your First Invoice in [Software Name] for Mac"
Next up is the description. Don't be lazy here. Write a solid, keyword-rich paragraph that sums up the tutorial and reinforces what you're teaching. This is also the perfect spot to add timestamps for different chapters, which makes your video much easier for viewers to navigate.
Finally, layer in some targeted tags. Put yourself in your viewer's shoes: what would they type into the search bar to find your video? Think about the software name, the specific task, and related terms like "macOS tutorial."
Nailing Your Mac Export Settings
Before you even think about uploading, you need to get your export settings right. Quality matters. You want your tutorial to look sharp and professional, whether it’s being watched on a huge 4K monitor or a tiny smartphone screen.
On your Mac, a few key settings make all the difference:
- Resolution: Always export in the highest resolution you recorded in. Aim for 1080p (1920x1080) or, even better, 4K (3840x2160). High resolution signals quality to both viewers and the platform’s algorithm.
- Format: The gold standard is the MP4 container using an H.264 codec. It hits the sweet spot between fantastic quality and a manageable file size.
- Frame Rate: Keep things consistent. Match your export frame rate to what you recorded at, which for most screen recordings is 30 fps.
Paying attention to these technical details ensures your video looks just as good online as it did on your editing timeline. A pixelated or blurry tutorial can instantly kill the credibility you've worked so hard to build.
Spreading the Word Beyond the Upload
Uploading your video is the starting pistol, not the finish line. To really get eyes on your content, you need a promotion plan. The idea is simple: meet your audience where they already hang out.
A fantastic move is to embed your video into a detailed blog post. This creates another asset that can rank in search engines and gives you a place to add extra context, code snippets, or written steps.
From there, start slicing and dicing your content for social media. Pull out short, compelling clips of the best "aha!" moments from your tutorial and share them on platforms like X (Twitter), LinkedIn, or Instagram. Make sure every clip links back to the full video. And don't forget your email list—these are often your most loyal fans, so let them know you’ve got something new for them.
The demand for this kind of content is only growing. The video tutorial creation software market was valued at $251 million as of 2025 and is projected to keep climbing. This growth is fueled by the very platforms you’re publishing on, showing just how much people want high-quality educational videos.
To really make your software tutorials pop, especially on a crowded platform like YouTube, you need to know the playbook for boosting visibility. You can learn a ton about how to get more views on YouTube and apply those same strategies to your content.
Frequently Asked Questions
Even with the best-laid plans, a few common questions always seem to surface when you're getting into the nitty-gritty of making software tutorials. Here are the ones I hear most often, along with some practical advice specifically for those of you creating on a Mac.
What’s the Best Screen Recorder for macOS Tutorials?
For a quick, one-off recording, honestly, the built-in QuickTime Player on your Mac is surprisingly capable. It's already there, it's free, and it handles the basics just fine.
But if you're serious about creating polished tutorials efficiently, you'll outgrow it fast. A dedicated Mac app is a completely different world. Tools designed for this exact purpose pack in features like automatic zoom, smart cursor highlighting, and integrated editors that save you from hours of painful post-production work. They’re built from the ground up to make your workflow faster and the final video way more engaging for your audience.
How Long Should a Software Tutorial Be?
This is a classic "it depends" question, but the best answer I can give is: as long as it needs to be, and not a second longer. The trick is to keep each video laser-focused on a single, clear goal.
- Explaining a single feature? Keep it short and sweet. 2-5 minutes is usually the sweet spot. People love quick wins.
- Walking through a complex workflow? This might take a bit longer, maybe 10-15 minutes. If you find yourself pushing past that, it's a huge red flag.
My rule of thumb is this: if a process feels too long to explain in one go, break it down. A series of shorter, digestible videos is always better than one long, overwhelming one. It keeps people engaged and makes the information far easier to absorb.
How Can I Make My Tutorial Audio Sound Better?
Don't skip this one. Clear audio is absolutely critical—I'd argue it's even more important than pristine video quality. The good news is you don't need a high-end recording studio to sound great.
First things first, get a decent external USB microphone. This is, without a doubt, the single biggest leap in quality you can make. The built-in Mac mic just doesn't cut it. Next, find a quiet space. A room with soft furnishings like carpets, curtains, or even a closet full of clothes works wonders for killing echo and background noise.
When you hit record, just speak clearly and at a natural pace. Once you’re done, a little bit of editing can clean up any remaining background hum and even out your volume levels. These simple tweaks make a world of difference and give your tutorial that polished, professional feel that keeps viewers tuned in.
Ready to create stunning, professional software tutorials on your Mac without the steep learning curve? Screen Charm gives you the power of automatic zoom, custom cursors, and an integrated editor, all in one simple app. Start creating tutorials that captivate your audience today.